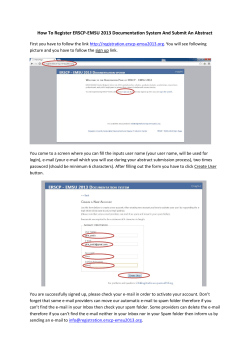
HOW TO: Check the ICE Box for blocked e-mail messages
HOW TO:
Check the ICE Box for blocked e-mail messages
1. Connect to the Internet.
2. Type in the following Web address: http://ice.crg.org
NOTE: The ICE Box supports Internet Explorer and Mozilla Firefox browsers. If you use a service like
AOL, you will need to log on to the Internet through your AOL account, then minimize your AOL browser
and open one of the supported browsers.
3. The page that opens will have a login box (see picture at right).
NOTE: If you see a message that indicates you need to install
an “ActiveX” controller or an Adobe Plug-in, please click OK
and Install. These are related to the administration of your ICE
Box account.
4. Your username is your complete email address. For example, my login is ecrutchfield@crg.org.
5. Your password is the same password you use to login to your CRG Web mail. If you do not remember your
password, please call Elaine or Darreleen.
6. Click “OK.”
7. You will see the following screen. This is called the “message queue.”
8. From this screen you can see the messages that are waiting for someone to “authenticate” them so they can
be forwarded to your inbox. Most messages shown here will be SPAM. There is no need to delete these
messages or clean out your account as the ICE Box will delete all messages that are over three weeks old.
9. If you are “watching” for a particular e-mail or are aware of an e-mail you should have received and did not,
this is the place to look for those messages. Sometimes a message from FedEx, UPS or a travel agency may
be “tagged” as bulk spam by the ICE Box. To see these messages, tagged as bulk, click button that says
“show bulk.” You will see a small blue square in front of e-mails that are tagged as bulk.
Rev. 6.15.07
ec
Page 1 of 3
HOW TO:
Check the ICE Box for blocked e-mail messages
10. To force a message from the ICE Box to your email inbox, click on the message. Once you have selected
the message it will be highlighted and the check box next to the number on the far left will be checked.
11. Next, click on the “Actions” button.
12. You can choose to do one of the following:
•
“accept messages” – which will push this one message to your e-mail inbox
•
“add message senders to accept list” – which also will push the e-mail to your inbox AND adds the
sender to your “approved contacts” list, meaning the next e-mail you receive from this person will be
delivered automatically to your inbox
13. If you have a new e-mail contact or subscribe to a new e-mail newsletter or notification service, you need to
add that contact to the ICE Box to make sure it will be delivered to your inbox. Most subscription services,
newsletters, etc., will give you an e-mail address and ask you to “contact your system administrator” and
have them add this address to their SPAM filters or white lists. You can control this yourself for your email account. If you need something added to the system level approved list to make sure all CRG staff can
receive it, please contact the network administrator.
Rev. 6.15.07
ec
Page 2 of 3
HOW TO:
Check the ICE Box for blocked e-mail messages
14. To add an address to your “approved contact list” click on “Contacts”
from the left tool bar.
15. The Contacts screen will show you a list of everyone in your “approved contact list, by name, address, and
the date they were added.
NOTE: You do not have to add in CRG staff as all CRG e-mail accounts are automatically permitted.
16. To add a contact, click on the “New” button, circled
above.
17. Enter your new contact information into the box that
appears. (See example at right.) From the action list,
make sure the selection is “Accept.” Then click on the
“Save Changes” button. Messages from this e-mail
address will then be automatically forwarded to your
inbox.
NOTE: If there is an e-mail address from which you do
not wish to receive e-mail, you can add that to your contacts and select the Action, “Drop.” This will block
mail from this e-mail address.
There are other functions available to you in the ICE Box user interface. Most are related to changing the way
you view things in the different screens. The information presented in this summary is the basic instructions for
checking for “trapped” e-mail and adding “approved” contacts to your list. If you have other questions, please
contact the network/e-mail administrator.
Thank you.
Rev. 6.15.07
ec
Page 3 of 3
© Copyright 2025


