
HOW TO DRY MEAT AND MAKE PEMMICAN
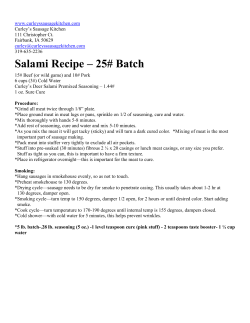
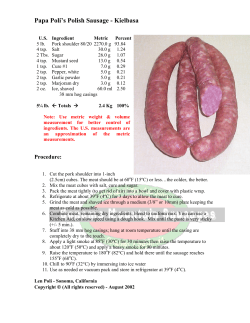
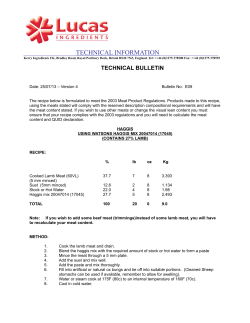
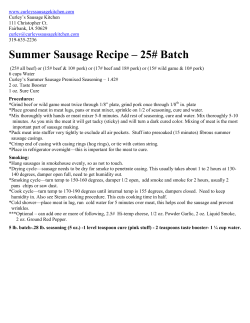
HOW TO DRY MEAT AND MAKE PEMMICAN
By Oliver Cameron
with Ole Wik
Quite often I have so much meat to take care of all at once that the best thing is to freeze
some of it, but meat that is dried in the open air, like spring-dried meat, is the best food.
I prefer to dry meat that has not been frozen, because it has all the juices in it. The juices
separate out of the cells of frozen meat as it thaws.
People need to be aware that when they’re eating meat, it feels more like carbohydrates in
the stomach. They don’t want to get fooled by that. They want to be sure that they’re
eating some fat or carbohydrate to balance the protein.
You can dry and eat a skinny animal, but if you’re in an emergency situation, it’s not
going to help you a whole lot. Protein is not a good substitute for energy food—
especially protein that has absolutely no fat. If you eat very much of it, you’re going to
lose weight, and you’re going to have a kidney problem. It’s the same thing as if you’re
starving to death and are eating your own body.
It can lead to ketosis1.
Yes. That’s the word I want.
In the early days, when the first pioneers settled the west, some of them had a real hard
time, and eventually had to kill some of their animals to have something to eat. They had
a problem with that. By that time, the animals were so skinny that they weren’t much
good for food.
I don’t care what kind of animal it is—if it’s really skinny, it’s not fit to eat. It’s like
“rabbit starvation”. That’s what happened to Indians in interior Alaska when they were
forced to live on skinny rabbits.
I don’t have any experience with rabbit starvation, but I’ve heard it mentioned that if you
are in that situation, you want to eat the guts of the rabbit too. That’s definitely just a
rumor that I’ve heard, and I don’t have any experience with it.
I once went to visit an older Eskimo lady in Ambler, and arrived as she was having lunch.
At one point she said “don’t watch”, dipped the guts of boiled ptarmigan in seal oil, and
ate them right down.
She was lucky to have seal oil.
The Indians in the southwest or maybe Mexico would catch a rat or any small animal and
put it in the fire to burn the fur off. I don’t remember whether they gutted it or not.
They’d put it on a stone and mash it up fine to break all the bones. I’m not sure if they
mashed it after cooking or before. But anyway, they ate the whole works—bones, guts
and all.
What about the teeth?
If you’ve lived out very long, you have an educated tongue.
Tell me how you dried meat.
In spring camp, we’d have animals lying around, gutted and skinned. The flies would
start coming out and accumulating on the sunny side of buildings and trees. Then it was
time to get that meat cut up and hanging on a rack.
At that time of year it’s still cool, so you don’t have to be quite so fussy about cutting it in
such a way that it will dry quickly. The flies haven’t bred, and aren’t laying eggs yet.
You can cut most of the meat off a spine and just hang the whole thing up—the long
backbone with the pelvis on it. You’ve don’t have to worry about getting all of the meat
off. Quite often I open up a shoulder, cut in layers so that it’s kind of unrolled, and just
hang the whole thing up.
If you’re alert to it, you can smell when raw meat is starting to get a little ripe and is
starting to spoil. Cooked meat, on the other hand, can be spoiled and you may not know
it. Any meat that gets questionable, I give to the dogs.
Dogs have a greater amount of acid in their stomach, and can eat things that we can’t.
Just because the dog has eaten something, doesn’t mean that we can eat it.
I once tossed a caribou kneecap to one of my leaders. That bone was about 1-1/2” long
and 3/4” thick. I expected her to chew it up, but she just swallowed it down in one gulp,
like a pill. That did set me to thinking about what kind of stomach acid they must have.
If you get caribou or moose meat in the fall, just before freeze-up, you can skin it out and
hang it up in quarters. A dry crust will form on it, and maybe a little mold, but at that
time of year it’s cold enough that it’s not spoiled. You can just leave it hanging up and
use off it, little by little.
When it gets a little colder, you can glaze it with ice. You cut a hole in the ice on the lake
or river, dip your meat in the water, pull it out, and let it freeze. You repeat that until you
get it covered with ice. That keeps it from drying out more. Once it’s well coated, you
can bury it in the snow or put it in a cache, with some grass or something around it for
insulation. It will keep quite well that way.
I used to do that with caribou in early winter. I’d hang several large chunks of meat on
a tripod near the water hole and throw water over them. Every time I went for water, I’d
take the dipper and give them another coat. I’d also toss soft snow on them while they
were still wet, so it would stick and hold more water the next time.
After I’d built up a layer of ice half an inch thick, I just stored the meat in our old sod
hut, without any covering. That prevented freezer burn, and weasels and shrews couldn’t
get at it.
The next spring, I gave a nice fat haunch to Charlie Jones. He said that was the best
quaq2 they’d eaten all winter.
2
Glazing meat, using water and snow. Photos by Sasha Wik.
When I buy meat in the wintertime, or even if I don’t buy it, if I have meat that’s frozen,
there’s two ways that I take care of it. The first way is to dry it.
I made a special drying device that hangs over my stove. It consists of a special crossbar
and a number of removable hangers made of clothes hanger wire. The business end of
each hanger is shaped like a three-sided glovers needle3 that will easily pierce the strips
of meat as I hang them. The crossbar is made in such a way that the hangers are held
rigidly in place in relation to one another, so that the meat on one is not going to be
touching the meat on the one next to it.
3
I can raise or lower the whole setup, depending on how hot the fire is. It wasn’t all that
much to make that outfit, but it sure makes it a whole lot easier to hang meat. You don’t
have to fool around taking the meat down and changing it, because each piece is exposed
to the air all the way around.
Meat shrinks as it dries. You can tell when it’s dried up enough that you can crowd the
pieces together a little bit. At that point they’ll be fairly dry on the surface, and it won’t
matter if they touch each other. You can usually take all the meat from two hangers and
put them on one. You want to be kind of careful to use the same holes, because the meat
may split if you try to make a new hole when it’s hard like that.
Meat drying rack that Oliver made in Norway. This meat is nearly
ready to be taken down and stored. Photo: Heidi Dammann
Do you sometimes use this rack even when it’s not hanging over the stove?
You can, but usually it’s over the stove, especially to start with. No matter how you dry
your meat, you have to dry it quickly enough that it doesn’t spoil. After it’s somewhat
dry but not yet brittle dry, you can hang it off to one side a little bit, and it’ll dry up over a
period of a week or two.
I made a couple of long bags that are maybe six or eight inches deep, and of such a length
that I could tie them onto a little pole or fasten them onto a shelf with a hook. I sewed
vertical seams to divide them into several pockets, 10 or 12” wide. When the meat was
reasonably dry on the outside, but not brittle dry, I could put it into those pockets and
hang the bag up under the ceiling, where it was hot. It would finish drying over a period
of time.
“Sack meat”
4
After meat is dried hard, it still isn’t stable. When it’s exposed to the air, it’s being
oxidized a little bit and gets old rather quickly, so I don’t want to count on keeping it that
way any longer than I have to. Just as soon as it’s brittle dry, I take it out and make a
powder out of it.
I crumble it up somewhat, put it in a mortar made from a stick of birch, and hammer it
out with a pestle. That breaks it up a little finer. Then I run it through a meat grinder so
that it’s almost a powder.
“A pestle is a heavy stick, usually made of stone or wood, used for grinding or
crushing food or other substances. A mortar is the bowl in which the substance is
ground.” Text and image from the University of North Carolina at Chapel Hill,
http://www.learnnc.org/lp/multimedia/6430
Then I take two plastic bags, one inside the other. Some plastic is designed for use with
food and some of it is not so good with food, so I usually use the baggies that are
designed for that. In fact, I buy them in a big roll.
I put the meat powder into the doubled plastic bags, put them inside a cloth bag, and tamp
them down with a little stick that’s somewhat rounded on the end. The cloth bag needs to
be a little bit smaller than the plastic bags so that the pressure of the tamping stick won’t
come against the plastic.
When I get the bag tamped down full, I pull the top together and tie it. Then lay it on its
side on the table and hammer it out somewhat flat with my fist. It won’t be real flat, but
will be flat on two sides. That also will fill up the space a little differently, so that if
there’s a little air in the end of it, it will fill that up too.
Meat put up that way will last a long time. I’ve had some that I stored in the cache and
used two or three years later. Summertime heat didn’t seem to make any difference. Of
course if a bear or a weasel or a mink or a marten got in the cache, that might make a
difference.
When you get ready to use the powdered meat, you can mix it with a little fat, put it into a
soup or stew, or just soak it a little bit and eat it with a spoon.
5
“Sheet meat”
During the winter, when I bring a piece of meat into the house and cut it up, I cook what I
want and put most of it outside so that it will stay frozen. I take the parts that are
unsuitable for steaks and roasts and grind them up into hamburger, and then they’re
edible.
I have a different way of handling ground meat that’s marbled with fat. Quite often,
especially in the wintertime when the house is heated anyway, I’ll dry it in trays.
In Idaho and I don’t know where all else, if you’re drying meat, it has to be heated up
somewhere in the process. I think the critical temperature is 145 or 150 degrees. That
kills off the bugs, and also lot of enzymes.
People have gotten sick from meat that wasn’t properly dried, so I cook the meat, or at
least heat it enough. I usually heat the ground meat in a pan and stir it around. I keep
checking it with an oven thermometer to make sure that it’s sterile. When I’m sure that it
has reached the right temperature, I pour the juices off.
I have some cardboard drying trays, maybe 16” wide and 30” long. Then I have a
plywood rolling tray that is a little wider than those cardboard trays. It has strips of wood
on each side that are 5/32 to 3/16” high.
I lay a strip of flat plastic material on the rolling tray, a little wider than the distance
between those two strips. Sometimes I dribble some of that juice around on the plastic
and let it dry there, since it has quite a bit of food value. If I don’t do that, I use it in
cooking or drink it as broth.
Then I put the ground meat on the plastic. I pat it out a little bit with my hand, and put
another strip of plastic on top of it. Then I take a round stick of wood and use it like a
rolling pin to flatten the meat out. It’s long enough that it rides on those strips along the
edges. The meat spreads out flat and is about 3/16” thick or a little less, depending on my
drying situation.
When I have it all rolled out, I peel off the top layer of plastic and slide the bottom layer
onto my cardboard drying tray, meat and all. I set that on a couple of poles above my
stove. I like to dry the meat in the house, because I have better luck at controlling flies.
When it’s semi-dry, I take the edge of a hotcake turner or something, cut it into fairly
large squares, and hang them. Once ground meat has dried somewhat, it has enough glue
in it to hold it together in a big sheet.
I usually have some poles that are made like the racks I described for coat hangers,
except that I just drive nails into each side of them and cut the heads off. I left 3/4 of an
inch of the nails sticking out, or a little more. I just drape a sheet of the partly dried meat
over one of those poles.
I put that stick on the table and push fairly big pieces of meat down onto the nails. Then I
hang it up on a pole, with the meat vertical, and let it finish drying that way. It’s
important to be sure that the fat in the meat has also dried. It won’t dry as quickly as the
meat will.
6
When everything is real dry, I crumble it into little pieces and pack it in gallon-size
plastic bags. Since the fat has dried, it doesn’t turn rancid. But as soon as the weather is
cold enough, I put fattish meat like that in a cold hole, where the temperature is below
refrigeration temperatures.
Once the nighttime temperatures are freezing, I can put it up in the cache, where it’ll stay
frozen. Even if we get a warm spell for up to a week, it will be OK. It won’t thaw much,
because it’s packed tightly in fairly large bags.
Sometimes I score the meat while it’s still in the tray. I’ll lay three or four pieces of those
on top of one another, and put them away like that. But I don’t keep much of it that way,
because there’s too much air around it when it’s just loose in a bag, and it deteriorates.
It all depends on what my plans are. If I have quite a bit of frozen meat on hand, I’ll have
a package of frozen meat and usually cooked meat. If I’m out traveling around, I usually
powder it up and put it away or make pemmican of it. Then I’ll take a bar of that
pemmican and use it the same way. When you’ve got some pemmican, you have a
complete meal.
Pemmican
If I plan to make pemmican, and I generally do, I use fatter meat. I do much the same
thing with fish. You can just split and gut them and hang them over a pole. As they dry,
you turn them over. You may have to turn them a couple of times.
After I’ve got the meat all powdered out, I put it into a kettle and pour hot rendered fat
over it. Each time I push a stick or the bottom of a spoon into it, the fat will run down
into the little depressions that I’ve made there. That’s how I know that I have added
enough fat to bury all of the meat particles completely.
Sometimes I add some dried berries, usually black currants. That makes it a little bit
special.
While the mixture is still soft, I pack it into any shape I want. I wrap it in two or three
layers of Saran Wrap. I usually make small enough pieces that I can eat maybe half of it,
and then have another meal out of it.
You just about have to have your pemmican 50 percent fat by weight in order to preserve
your meat. If you’re eating very lean meat, like squirrels or rabbit or other small game,
you can eat your pemmican along with it, because it has excess fat.
When you eat pemmican, you have to have enough meat so that you can eat enough fat
and feel satisfied. But you can usually eat more dry meat along with your pemmican
because the amount of fat in the pemmican is a little more than what you really need.
Do you find that membranes in the meat make it hard to grind?
I don’t have a picture of what you’re talking about.
After my meat is dry I put it through a mill that’s designed to grind up corn or any kind of
grain. It’s a clamp-on thing, but is quite a bit bigger than an ordinary meat grinder. The
finished product is like corn meal, not as fine as flour.
7
What I meant was that when Sasha and I made pemmican, we found that some cuts of
meat had tough membranes inside that choked the grinder.
With a regular meat grinder, you have a disk with little holes, and you’re continually
having to take it apart to clean it.
Exactly.
That’s why I like that other grinder. The membranes go right through. It doesn’t have
that round disk with holes in it.
Sasha Wik’s method of making pemmican, start to finish. Left to Right: Dried
caribou meat in sack; dried meat with visible membranes removed; freshly
ground dried meat; bowl of melted caribou fat; finished mixture pressed
into pan and scored with a table knife. Image: Sasha Wik
There are three kinds of grinders. One is an ordinary food chopper that has an opening in
the end where the ground product comes out, with quite large holes.
Then it has a disk cut into little edges that stick out from the center, and that works better
than a meat chopper. It doesn’t plug up as bad as a meat chopper does. A meat chopper
works alright if you keep it sharp for raw meat, but a food chopper will grind dried meat
fine enough that you can pack it tight in a bag.
The other machine I’m talking about is a grain grinder. They’re not as common here as
they are in South America. The one I have was made in Colombia. I found it in a store
that caters to people from South America. They probably use them to grind corn for
tortillas.
When some people dry meat, they cut it into small pieces, string it on a string using a
needle, and then hang that string up tight. I don’t like to fool with that.
At spring camp I used to string a rope tightly between two trees, and then wind a second
rope around it in such a way that the twists were five or six inches apart. Sasha would cut
the meat into thin sheets, and I’d hang them over the second rope. The main rope would
hold them there.
After a day or so a crust would form on the outside of the meat, but the sheet would still
8
be wet right at the rope and where the two inner surfaces were touching. That was a
temptation for gray jays, so on the second day I’d go along the rope, unfold the sheets,
and turn them over so that the wet sides were facing out.
By that time the meat had stiffened enough that the two partially dried sides wouldn’t
touch each other. They looked like little ladders with their legs spread. After tending to
the meat that one time, I didn’t need to touch it again until it was ready to be taken down.
Ole Wik’s two-rope system for hanging meat to dry.
Image: Sasha Wik
I’ve never tried that, or even heard of it, but I can see it would work.
My way is to make two tripods, maybe 6’ high, using three forked sticks each. I tie little
poles to them, cut my meat in strips, and hang them on the poles. But then I do have to
keep turning it, so that the part that’s over the pole gets dried too.
_______________
1) This essay stems from a series of telephone conversations that Ole Wik had with
Oliver between December 2007 and February 2008. Highlighted text indicates remarks
made by Ole.
2) Quaq is the Inuit word for raw, frozen meat or fish. It is invariably served with seal
oil.
3) Leather needles are sometimes referred to as glovers needles because years ago they
were used by glove-makers. These needles are still used today in all types of leather
work, including shoemaking and shoe repairs, belts and leather garments. They have a
triangular point which enables them to pierce and pass through tough materials without
tearing.
9
Text and photo: http://www.handtools-uk.com/default.php?cPath=96
10


© Copyright 2025