
Buildbox User Manual v1.1.1
Buildbox™ User Manual Buildbox™ User Guide This document is current for version 1.1.1 of Buildbox™ Copyright © 2015 - Buildbox.com 2 Buildbox™ User Guide Contents Summary What’s New for Version 1.1.1 ................................................................................................................. 7 Buildbox™ Screens .................................................................................................................................. 8 How Do I................................................................................................................................................ 55 Online Training Videos .......................................................................................................................... 59 The Basics .............................................................................................................................................. 63 Export/Compile Checklist ...................................................................................................................... 68 Index...................................................................................................................................................... 69 Copyright © 2015 - Buildbox.com 3 Buildbox™ User Guide Contents What’s New for Version 1.1.1 ................................................................................................................. 7 Buildbox™ Screens .................................................................................................................................. 8 Scene Editor ........................................................................................................................................ 8 Drag-Drop to Create New Items ..................................................................................................... 8 Background ..................................................................................................................................... 9 Character ....................................................................................................................................... 10 Connections .................................................................................................................................. 12 Objects .......................................................................................................................................... 13 Sub-Objects / Object Instances ................................................................................................. 14 Actions .......................................................................................................................................... 17 Action Placement ...................................................................................................................... 18 Effects............................................................................................................................................ 19 Trail ........................................................................................................................................... 19 Light........................................................................................................................................... 20 Flag ............................................................................................................................................ 21 Timeline Editor .............................................................................................................................. 22 Keyboard Shortcuts ....................................................................................................................... 23 Editor Controls .......................................................................................................................... 23 Game Playing Controls .............................................................................................................. 25 Menus/Screens ................................................................................................................................. 26 Menu Overview ............................................................................................................................. 26 Game End Screen ...................................................................................................................... 27 Menu Editor .................................................................................................................................. 28 Controls ..................................................................................................................................... 28 Buttons .................................................................................................................................. 28 Button Action Table .............................................................................................................. 31 Joystick .................................................................................................................................. 33 Accelerometer....................................................................................................................... 34 Labels ........................................................................................................................................ 35 Copyright © 2015 - Buildbox.com 4 Buildbox™ User Guide Font Editor .................................................................................................................................... 36 Collision Shape Editor ................................................................................................................... 37 Project Settings ................................................................................................................................. 39 General .......................................................................................................................................... 39 Gameplay ...................................................................................................................................... 41 Game Frame Settings .................................................................................................................... 43 Advanced Gameplay Settings ....................................................................................................... 43 Keyboard Key Binding ................................................................................................................... 43 Advertisements ............................................................................................................................. 44 Apple iOS App Store .................................................................................................................. 44 Apple Mac App Store ................................................................................................................ 44 Google Play Store ...................................................................................................................... 45 Amazon App Store .................................................................................................................... 45 Microsoft Windows Marketplace ............................................................................................. 46 Preview ......................................................................................................................................... 47 Atlas Editor ........................................................................................................................................ 48 Buildbox™ Menu Summary ............................................................................................................... 49 File ................................................................................................................................................. 49 Edit ................................................................................................................................................ 49 Add ................................................................................................................................................ 49 View .............................................................................................................................................. 50 Tools .............................................................................................................................................. 50 Help ............................................................................................................................................... 50 Advanced .......................................................................................................................................... 51 Motors........................................................................................................................................... 51 Convert to Clones.......................................................................................................................... 51 Advanced Game Settings .............................................................................................................. 52 Advanced Image Options .................................................................................................................. 54 How Do I................................................................................................................................................ 55 Trigger an Event on the Other Side of the Screen? .......................................................................... 55 Copyright © 2015 - Buildbox.com 5 Buildbox™ User Guide Enemy That Dies on Player Contact .................................................................................................. 55 Make a Swinging Object.................................................................................................................... 56 Action with Physical Behaviour ......................................................................................................... 56 Make a Swinging Axe ........................................................................................................................ 57 Kill Enemies by Jumping on Their Heads ........................................................................................... 58 Online Training Videos .......................................................................................................................... 59 Overview Videos ............................................................................................................................... 59 Basic Functions.................................................................................................................................. 59 Building and Editing .......................................................................................................................... 60 Advanced Functions .......................................................................................................................... 61 Game-play and Settings .................................................................................................................... 61 Menu and Preview ............................................................................................................................ 62 The Basics .............................................................................................................................................. 63 Drag and Drop ................................................................................................................................... 63 PNG File ............................................................................................................................................. 63 PNG Drop Box ................................................................................................................................... 63 MP3 File ............................................................................................................................................ 63 Exportable App Stores ...................................................................................................................... 63 Image Scaling .................................................................................................................................... 63 Atlas / Sprite Sheet ........................................................................................................................... 64 Storage Space................................................................................................................................ 64 Device Memory ............................................................................................................................. 64 Color-Picker ....................................................................................................................................... 65 Animation Editor ............................................................................................................................... 65 Drag-Drop New Image/Animation ................................................................................................ 66 Advanced: Physics Objects ............................................................................................................ 67 Export/Compile Checklist ...................................................................................................................... 68 Index...................................................................................................................................................... 69 Copyright © 2015 - Buildbox.com 6 Buildbox™ User Guide What’s New for Version 1.1.1 Full details are to be found later in this manual. If you a previous user of Buildbox™ then you will find these major changes exciting: One-way collision Object’s Destroy options now separated from Collision Type, and expanded Text labels New collision types Accelerometer support Key Mapping Infinite Levels New Gameplay Action Type – changes game physics Powerups are now called Actions Game end screen, and scene – triggered by a new Action type. New Attributes for Actions and Buttons. All Effects are now able to be attached via Connection Mode On-screen Joystick support. Copyright © 2015 - Buildbox.com 7 Buildbox™ User Guide Buildbox™ Screens Scene Editor This is the screen you will be spending most of your time in, while using Buildbox™. It is also the first screen you will see upon opening it. Drag-Drop to Create New Items The easiest way to add a character, objects, Actions and backgrounds is to drag and drop a PNG file onto the scene editor. As soon as the mouse is over the scene editor you will see the following overlay. Drop the PNG file onto the relevant segment. You should see the item appear in the asset bar on the left, and also appear in the current scene you are editing. Copyright © 2015 - Buildbox.com 8 Buildbox™ User Guide Background To lock or unlock the background, press the padlock button at the top of the main scene edit area. When the padlock is not highlighted, you can select and edit the background elements. The following options are available: Image: this is a PNG dropbox. Speed: the speed the background will move. Different speeds on different background layers will show a nice parallax effect. Rotation: rotation of the background image. Scale(x,y): allows resizing and distortion of the background image. Opacity: how transparent. 1 is fully opaque and 0 fully transparent. Tiling Offset: not usually needed, however this lets you change the point at which the background image is butted against the next section for tiling. Fixed Rotation: keep tiling images straight up and down even as the background is rotated. To see this effect it is best to play with a rotated image and see what happens with the setting ticked or not. Keep in the mind the game direction setting when set up your background. Copyright © 2015 - Buildbox.com 9 Buildbox™ User Guide Character Buildbox™ only supports a single Character that the player uses interacts with. To set the initial position of the character, view the start scene, and drag the player to your preferred position which can be out of view if you want to have the player drop into view or something similar. All other settings are done by opening Character up on the lethand toolbar, and clicking on the character found there. These options you can set are found on the right, once the character is selected: Name: an internal name for your reference only. Collision Shape - Edit: set the collision shape used by the character. See the Collision Shape Editor. Default Animation: this is the sprite that gets populated initially. PNG Drop Box, however clicking on the pencil opens the Animation Editor. Shooting Animation: The animation to run when Character is shooting. PNG Drop Box, however clicking on the pencil opens the Animation Editor. Bullet Animation: The animation to show on the bullet object that is spawned when the Character fires. PNG Drop Box, however clicking on the pencil opens the Animation Editor. Jump Animation: The animation to run when Character is jumping. PNG Drop Box, however clicking on the pencil opens the Animation Editor. Move Animation: The animation to run when Character is moving. Why is this here? Well it is is useful if you have a game with a bipedal character can stand still, or run. In which case the default animation will be the character standing still, and this animation will show the character running. PNG Drop Box, however clicking on the pencil opens the Animation Editor. Defeated Animation: The animation to run when Character will die. PNG Drop Box, however clicking on the pencil opens the Animation Editor. Jump Sound: MP3 file – played when jumping. Shoot Sound: MP3 file – played when shooting. Defeated Sound: MP3 file – played when character dies Ground Collision: MP3 file - played when character collides with the ground. Copyright © 2015 - Buildbox.com 10 Buildbox™ User Guide Cast Shadow: if player will cast a shadow when struck from a light from a light effect. Game Over Effects: - effects to play when character dies. o Game Over Delay: seconds to delay starting game-over effects. o Camera Shake: seconds to shake the game display, or 0 to disable. o Camera Flash: seconds to show camera flash effect, or 0 to disable. o Fall Attribute: a non-zero value will cause the Character to fall off the bottom of the screen (assuming gravity is in a down direction). The number will determine how gar up (against gravity) the Character will bounce up before falling. Copyright © 2015 - Buildbox.com 11 Buildbox™ User Guide Connections To setup and edit connections, press the button highlighted, above. You will see a yellow dot at the centre of each item in the scene. To create a connection, drag and drop from the source to the destination entity's yellow dot. The source entity will be in control of the other entity. Ie where the source moves the destination will move too. Note: if you connect an object to the Character, and have platform objects that are set to destroy the Character, be sure that you set the parent object’s Health value to 1 higher than any object’s Damage value (even if that Damage value is 0). If you do not do this it will die on contact. It should be noted that connections may move about their axis, if the object they are attached to is able to move. You can see this by placing three objects on screen: First object fixed Second object physical Third object physical The second object will turn in place, while the third object will swing around if pushed (using the first object as a hinge). For more advanced usage, see Motors, under the Advanced section. Copyright © 2015 - Buildbox.com 12 Buildbox™ User Guide Objects Once an object has been created (see Drag-Drop to Create New Items) you can now edit them in the asset bar on the left, or edit any instances that are sitting in the current scene (referred to as subobjects). We will deal with the former, first. To edit the object, click on it in the asset bar, and you will see the options on the right, as you can see in the screenshot. The options are: Name: used for internal reference only. Collision Shape: see this reference. Default Animation: Shown most of the time object is on screen. See Animation Editor. Defeated Animation: shown when object dies. See Animation Editor. Idle Sound: sound that is played when object is awake and on-screen. Death Sound: sound that is played when object is dying. Wakeup Sound: sound that is played when the object wakes up. Health: if set to non-zero, it equates to the number of times instances of this object can be damaged before it dies. Damage: if set to non-zero, this is the amount of damage dealt by this object colliding with another object. Copyright © 2015 - Buildbox.com 13 Buildbox™ User Guide Sub-Objects / Object Instances So now you have defined your objects, you may be wondering where most of the settings are, and how to have different versions of the same object. Sub-Objects are where we do this. You create a sub-object by clicking and dragging an object from the object bar on the left. Just put the object where ever you want it in the scene. Click on your object to select it, and look to the options bar on the right. Now there are various settings that really only apply to different object types. A very fast way to set most of the properties you would want for particularly object types is the very first field: Object Type: Platform: this is a non moving object that is often used for a platform for the characters to walk on. Physics Object: this is for an object that you want to obey the laws of game physics. It will move around, bounce, etc and respond to forces acting on it. Enemy: this is an object that will kill the character on contact, and can be killed by attacking it. Enemy Bullet: similar to the above, this will spawn copies of itself at intervals. Decoration: this is used for scenery. It effects nothing, is effected by nothing. Its job is to look good. Character Bullet: this will spawn copies of itself at intervals. All copies produced will kill the character on contact. Wheel: as it sounds. Used for wheels including wheels attached to the character. Copyright © 2015 - Buildbox.com 14 Buildbox™ User Guide All Object settings: Position(x,y): object position in scene. Rotation: rotation in degrees clockwise. 0 is not rotated at all. Scale(x,y): how much bigger or smaller in either direction the sub-object is compared to the original object. 1 is normal size. Linear Velocity(x,y): object starting speed/direction. 0 is not moving at all. Random factor: an amount between 0 and this value will be added to the basic value. Angular Velocity: value in degrees per second that the object will rotate about its pivot point. Positive values are clockwise. Random factor: an amount between 0 and this value will be added to the basic value. Collision Type: o No Collide: object will never collide with anything. o Collide: object will collide with other objects Destroy Type: This has been split from Collision Type for greater flexibility. Determines if the Object’s Damage value will be subtracted from an objects Health value on contact (both those values are set on the parent Object) o No Destroy: Nothing will contact when this object’s collision box touches any others. o Destroy Character: Will damage the player Character on contact, only. Destruction of object collided with can apparently avoided by giving it a high health value. o Destroy Enemy: Will damage Enemy objects on contact, only. Destruction of object collided with can apparently avoided by giving it a high health value. o Destroy All: Will damage any enemy or player Character. Destruction of object collided with can apparently avoided by giving it a high health value. Wake Up: o Disabled: object will start awake. o Distance Based: object will wake up when the character is the specified pixels away from the centre point. o Collision Based: object will wake up when the character's collision box collides with it. Wakeup Distance: distance in pixels. Sleep: o Disabled: object will never sleep o Distance Based: object will sleep after moving the character is the specified pixels. Copyright © 2015 - Buildbox.com 15 Buildbox™ User Guide o Sleep Distance: distance in pixels. Spawner: if selected then this will spawn objects instead of being the object itself. Spawn Rate: time in seconds between object spawning. Spawn Action: o Permanent: always spawn. o Shooting: spawn when shoot button pressed. o Jumping: spawn when jump button pressed. Copyright © 2015 - Buildbox.com 16 Buildbox™ User Guide Actions Unlike objects, Actions are mostly configured from the parent in the object bar to the left. The basic settings are: Name: for your reference only. Collision Shape: see this. Action Type: o None: do nothing. o Coin: do nothing but add Reward number of coins to the player’s coin collection. o Kill All Enemies: Kill all objects of type Enemy, that have Destroy set to “Destroy Character” and are active (ie objects are not asleep). o Invincibility: make player invincible for a time, and will kill enemies on contact. o Action Magnet: suck other Actions toward the character while active. o Strike: when collected, a button when pressed will kill enemies in contact with the player. o Set Checkpoint: set a checkpoint, that will be used for Restart From Checkpoint button. o Next Checkpoint: move player character to next checkpoint. o Restart Checkpoint: give ability to restart at last checkpoint. o Gameplay: Allow any gameplay property to be changed. Will allow the Gameplay properties options to appear. Any game play property found in Project Settings can be changed. o End Game: change to the End Screen, screen. Typically used to show a successful game end (as distinct from standard game-over when the character dies) Copyright © 2015 - Buildbox.com 17 Buildbox™ User Guide The advanced settings are: Action Animation: PNG Drop Box for the animation to play when triggered. Animation Placement: Character: animation plays on character. Action: animation plays on Action location. Full Screen: animation plays full-screen. Animation Behaviour: o Overlay: run animation OVER the location. o Replace: replace really only makes sense with placement of Action and Character. You could replace character animation to change what your playing character looks like while the Action is working. Animation Repeat: o Looped: play animation continuously a long as Action is working. o Single Play: run animation once and stop. Idle Sound: sound to play when Action is on screen and not yet collected. Start Sound: sound to play when Action is initially triggered. End Sound: sound to play when the Action finishes. Price: how many coins will it take to purchase this Action. Leave to 0 if not purchasable. Reward: how many coins will be rewarded for collection. Duration: how many seconds Action will remain in effect. Appearance Chance: a value of 100 will always show this Action, and anything less than this will show it sometimes. 50 would mean show half the time the game is played. Camera Shake: shake the camera when Action is triggered. Camera Flash: run a camera flash effect on the whole screen when Action is triggered. Action Placement Placement of Action instances (a sub-Action) is the same as any other asset type. Simply drag and drop the Action onto the scene. As for Objects, you can select it, and set the following properties: Position(x,y): position on the scene. Rotation: in degrees. Scale(x,y): how big the Action is. 1 is full size. Copyright © 2015 - Buildbox.com 18 Buildbox™ User Guide Effects All the Effects work in a similar way. They are not Objects, so cannot be given physical properties. Some you can attach to objects however so you can in some cases make appear to have physics properties - by making the attached object bounce and move. Trail Trails can do all sorts of things, largely limited by your imagination. They can be used to show creepy tentacles, waving grass, smoke, etc. Options for a trail are: Position (x,y): as for any other placed item. Rotation: what direction it is pointed Scale (x,y): after the other options are calculated, the scale values are used to resize/distort the trail. Texture: a PNG drop box that lets you paint the trail with a particular texture. Start Width: how wide the tail will start with. End Width: how wide the tail will be at the end. Speed: how fast the tail will move. Length: how long in pixels the tail should be. Wave Height: how high each wave movement will be - the distance from the very bottom to the very top of the wave. Wave Length: how long each wave movement will be - the distance from peak to peak. Copyright © 2015 - Buildbox.com 19 Buildbox™ User Guide Light Lights are a nice simple way of providing atmosphere to a game. Be cautious about over using them however a too many will start to use up available CPU time. Options for a light are: Position (x,y): as for any other placed item. Rotation: at first glance this may have no use, however if you scale the light into an oval then rotation is useful for pointing that object in a particular direction. Scale (x,y): You would usually leave this at a value of 1,1 - because setting Radius is a better way of making the light bigger or smaller - however mixed value of x and y will let you distort the light. Radius: how big the light is. Color: what color the light is. This can have some non-obvious effects, like making the light object into a spreading darkness by making it a dark or black color. It is a full color-picker so you can set anything including transparency. Cast Shadow: a great way to add atmosphere. The various objects' collision boxes will be used for the shadows cast. Notes: Shadows will not appear in the editor. You need to run the Preview mode to see them. You can achieve a similar effect to light by careful use of an imported image Object. See the Character in the example game, Spark. Copyright © 2015 - Buildbox.com 20 Buildbox™ User Guide Flag A flag is just what it sounds - an image that appears to be rippling in a breeze. Now you are not limited to just flags - you may use this effect to animate jellyfish or similar. Just remember that if you want this effect on an enemy, that there needs to be an actual Object attached that will kill the player character. Available options are: Position (x,y): as for any other placed item. Rotation: angle in degrees that this should be rotated. Scale (x,y): You would usually leave this at a value of 1,1 - because the other settings will make thing bigger already. You can use these to distort the result. Texture: a PNG drop box that lets you paint the trail with a particular texture. Start Width: how wide the tail will start with. End Width: how wide the tail will be at the end. Speed: how fast the tail will move. Length: how long in pixels the tail should be. Wave Height: how high each wave movement will be - the distance from the very bottom to the very top of the wave. Wave Length: how long each wave movement will be - the distance from peak to peak. Copyright © 2015 - Buildbox.com 21 Buildbox™ User Guide Timeline Editor Default scenes view Opened scenes view To open the Timeline Editor, press the down arrow highlighted, above. This will easily show you all the scenes and how they are arranged. To go back to the simplified view, press the same button again. The Start scene is a special scene that will always be first. All other levels can be placed anywhere in the time line. Where two or more scenes overlap - as Scene 2 and 3 do in the example, Buildbox™ will randomly select from each of them at run-time. Each level will have an even chance of appearing. Where only a single scene appears - no overlaps - then scenes will just appear in order. If you look at the currently elected scene, above, you will see that the start and end position on the time line diagram, also appear on right. All numbers are in pixels. For easier testing, you can deactivate or "solo" scenes. "Solo" means show the same scene repeatedly. Colors will change to indicate what will appear in the Preview. To solo a scene, press the blue "S" next to the scene on the time line, or select the scene and press the "s" key on the keyboard. To disable a scene, press the red "M" next to the scene on the time line, or select the scene and press the "m" key on the keyboard. Copyright © 2015 - Buildbox.com 22 Buildbox™ User Guide A scene in green will be soloed, and scenes in red ware disabled for the Preview. Keyboard Shortcuts Editor Controls Scene Editor [space] activate hand tool. When hand appears, you can use click and drag to move the level around. [shift] constrain aspect ratio when scaling anything. [command]-Right click (Mac) show list of objects under the mouse (Mac only). Click an object in the menu to select it. [ctrl]-right click (PC) Right click show layer menu with these options, which will be performed on the selected object, character, Action or effect: Bring to Front: move to the very front. Bring Forward: move forward one layer. Send Backward: send backward one layer. Send to Back: send to the very back. Mouse scroll zoom in and out. [command]-C (Mac) copy currently selected object, character, action or effect. [ctrl]-C (PC) [command]-V (Mac) paste currently selected object, character, action or effect. [ctrl]-V (PC) [command]-X (Mac) cut currently selected object, character, action or effect. [ctrl]-X (PC) D duplicate-right, currently selected object, character, action or effect. S duplicate-down, currently selected object, character, action or effect. A duplicate-left, currently selected object, character, action or effect. W duplicate-up, currently selected object, character, action or effect. Copyright © 2015 - Buildbox.com 23 Buildbox™ User Guide [command]-[shift]-4 (Mac) tool for calculating number of pixels in a specific area and make a screenshot of an area. Drag and drop move currently selected object, character, action or effect. [shift]-Drag and drop move currently selected object, character, action or effect horzontally or vertically only. ←↑→↓ move currently selected object, character, action or effect. [shift]- ←↑→↓ move currently selected object, character, action or effect by 5 pixels [alt] (PC) Show connections [option] (Mac) With an object selected, change the Object Type [ctrl]-1 (PC) Platform [command]-1 (Mac) [ctrl]-2 (PC) Physics Object [command]-2 (Mac) [ctrl]-3 (PC) Enemy [command]-3 (Mac) [ctrl]-4 (PC) Decoration [command]-4 (Mac) [ctrl]-5 (PC) Enemy Bullet [command]-5 (Mac) [ctrl]-6 (PC) Wheel [command]-6 (Mac) Scene management D duplicate currently selected scene. [Delete] delete currently selected scene. M mute scene for testing in play mode. S Solo scene for testing in play mode. Copyright © 2015 - Buildbox.com 24 Buildbox™ User Guide Menu Screens Editor M Mute or enable the currently selected screen Game Playing Controls These controls will work in the simulator – assuming the controls have not been customised - and on Mac and PC. ← move character left. → move character right. ↑ move character up. ↓ move character down. J jump < (strictly speaking, it is ",") rotate character left > (strictly speaking, it is ".") rotate character right. z rotate motors backward. x rotate motors forward. [space] Shoot Copyright © 2015 - Buildbox.com 25 Buildbox™ User Guide Menus/Screens Menu Overview This screen shows an overview of the Buildbox™ menu structure for your game, including what screens allow you to navigate to what other screens. Some screens are required, and some screens are optional. The lines on this diagram show what screens are potentially able to open other screens. If you leave a button off a screen (eg no "info" button on Main Menu) then the missing destination screen will not appear to the user. This is useful given that not all screens are required. To edit a screen’s options, simply click on one of the boxes. You will then see the following options appear on the right: Music: drag and drop an mp3 file for music to any music to play on this screen. If you use an identical mp3 file for music on several screens, Buildbox™ will currently store that several times. Note that there is no need to do this, given that many of screens are overlays (like the pause screen for example) so you would only put in another sound file if you wanted to override the music already playing. Copyright © 2015 - Buildbox.com 26 Buildbox™ User Guide Ad Interstitial: what ad network will show on this screen. Note: if you select an ad network that is not on the platform you are exporting, no ads will show on this screen (eg if you select Vungle and export to PC, there can be no ads shown as there is no such thing as Vungle on the PC at the time of writing). Ad Banner: for screens that support banners, what banner should show. Ad Frequency: 0 means no ads. 1 is every time the screen is shown, 2 is shown every two times this screen is shown, and so on. Loop Music: if ticked, the music will play continuously. If not ticked it will play once and stop. Background Scene: what screen to run in the background (main menu only and End Screen only). To edit a screen, just double-click on one of the boxes - this will take you to the Menu Editor. A brief summary of each screen: Start: first thing user sees when game is launched. Main Menu: as it says, the purpose for this to allow users to navigate to other screens. Shop: This is where you will sell IAPs if you have any, for platforms that support IAPs. Game Field: shows when the game is playing. It is where you will create any on-screen buttons of for movement, etc of the character. Game Over Screen: shows when the game has ended and the game lost. End Screen: this is the screen displayed when the game has been won – by collecting an Action with an Action Type of “End Game”. Pause Screen: shows when the game has been paused. Game End Screen If a anything is added to the Game End screen, it will display when the Character has triggered an Action with Game End set. If a Background Scene has been set, then the displayed scene will change when this is triggered. The Character will stop responding to user controls, and keep moving in the direction it was last moving in. If a Background Scene is not set, then the character will not be displayed. Copyright © 2015 - Buildbox.com 27 Buildbox™ User Guide Menu Editor The screen will look something like this when you open it: Controls Buttons Drag in a PNG file in as shown below. Depending on what segment you drop it, you will have different options sections on the right as can be seen in the following screenshots: Copyright © 2015 - Buildbox.com 28 Buildbox™ User Guide Purchase Button Action Button Image Button (also available by dragging the Button icon from the left of screen) Copyright © 2015 - Buildbox.com 29 Buildbox™ User Guide To create a hidden button, drag the Button icon from the left and onto the main screen . An example of a use for a hidden button would be a button the size of the whole screen for the "press screen to jump" function of an endless runner or flappy-type game. Note: no matter how the button is created, you can change or remove the image at any time - you are not stuck with a button being transparent or wrong. These are the options available for a button or image (not every property applies to every button type - see above for what applies): Action: what the button does when pressed. Available options vary depending on what screen you are working on. See the available Actions table. Type: What to purchase when triggered: o Action: when selected then Action Selection will be available as well, and pressing will trigger Action. o Remove Ads: to get rid of ads when triggered. Name: internal name for your reference only. Appears on the layout area so you can see what you are doing - especially useful for a hidden button. Rotation: the angle the button is on. Scale(x,y): how the image is scaled. Image: drop a PNG file here to change the image Autohide: number of seconds to show before hiding. Stick to Edge: button will stay on the edge of the screen when scaling is done for different sized screens. Keyboard Key: This allows you to add keyboard control. It works the same way as the gamewide keyboard controls: refer Keyboard Key Binding (page 43) Block Touch: If this button is in front of another button, do NOT pass the touch through to the buttons behind. This is useful if you have a screen-size hidden button (like Flappy Bird did) and you want your pause button to work without triggering the full screen button. Just be sure and tick this box on your pause button. Buy and Use: use item immediately when purchased. Quantity: number of Actions after game install or after resetting a game, that you can earn through the timer. Price: cost in in-game currency (ie coins). In App Purchase: Tick this to enable an IAP. It will allow you to fill out this extra field: o Store Identifier: for an in-app purchase through an app store (purchase with real money. Price is set on whatever company’s servers are used to drive the purchase – Apple/Google/etc). Copyright © 2015 - Buildbox.com 30 Buildbox™ User Guide Actions-only settings Action Selection: what Action will be triggered when pressed. This list is determined by what Actions you have defined (found on the main screen, on the left). Label Offset (x,y): where to show the uses the player has left of the Action, if limited. Label Scale: numeric value from 0 to 1 which will scale down from the standard size font defined for labels, generally. Layering: Where will the activation animation of the Action appear? o Above Character: animation is in front of the character – for things that you want to obscure your character slightly. o Below Character: animation behind character – would look good for a starburst to highlight the character. Refill Settings Unlimited Use: will be unlimited if this is selected. If NOT selected, the next three options will be available. Max Refix: amount of Actions after game install or after resetting game, that you can earn through the timer. Refill Timeout: amount of time, in seconds, to wait before you can earn an additional Action. Refill at Start: refill Action to max refill each gameplay (instead of initial game install or reset). Visibility Threshold: the amount of uses (ie button presses) that need to be available to show this button. Otherwise it will be hidden. Button Action Table The available actions are: Start Main Shop Info Pause Game Game End Action Description Menu Screen Field Over Screen Back Back to previous screen. Char Jump Character will jump in the air, paying attention to game jump settings. Char Shoot Character will shoot. Char Rotate Left Character will rotate left. Char Rotate Character will rotate right. Copyright © 2015 - Buildbox.com 31 Buildbox™ User Guide Start Main Shop Info Pause Game Game End Action Description Menu Screen Field Over Screen Right Char Move Right Character will move right. Char Move Left Character will move left. Char Move Up Character will move up. Char Move Down Character will move down. Coin Shop Show Coin shop. Game Services Load Game Services, or the relevant version thereof for the current platform. Will not display for platforms with no such thing. Info Screen Go to Info screen. Start Checkpoint Go to the game field and start game from last saved game checkpoint. Start Game Go to the game field and start. Motors Spin CW For a positive motor speed value, spin the motor clockwise. Motors Spin CCW For a positive motor speed value, spin the motor counter-clockwise. Pause Show pause screen. Reset Settings Reset everything in the game so it can be started from scratch. Restart from Checkpoint As per Start Checkpoint. Restart Game As per Start Game. Restore Purchases restore IAPs on devices where IAPs are supported by Buildbox™. Copyright © 2015 - Buildbox.com 32 Buildbox™ User Guide Start Main Shop Info Pause Game Game End Action Description Menu Screen Field Over Screen Review Go to review the game on the pp store, for app stores that are supported by Buildbox™. Share Start user sharing window. Email so far on mobile devices. Sound Off Turn sound off. Will display if sound is on. Sound On Turn sound on. Will display if sound is off. Upgrade remove ads on devices where advertising and IAPs are supported by Buildbox™. Note: on Android devices, the system back button corresponds to the "Back" button action, above, and cannot be disabled. On game-play screen it will bring up the pause screen, and on pause screen it will go back to gameplay (this is to stop an accidental double-tap of the back button from exiting the game and annoying the player). Joystick This allows you to have an on-screen joystick. To create one, drag the Joystick button from the left onto the game-field. Resize and place as appropriate to whatever portion of the screen you want the joystick control to be available. The following options are available for Joystick: Position(x,y): where on screen to place it. Rotation: this does not have an effect the working of the joystick. Scale(x,y): determines how big the joystick is. Sensitivity: A value of 1 will mean the character will move at the same speed as your finger. A smaller value will see less movement. Eg 0.5 will move at half speed, and 2 will move at double your finger speed. Control Style: How the joystick will work. Has the following values: o Absolute: you drag your character around the screen. o Relative: Works like a standard analogue joystick. The more you move from the center position in any direction, the faster you will change to move in that direction. Copyright © 2015 - Buildbox.com 33 Buildbox™ User Guide Accelerometer This control works quite similarly to the on-screen joystick. The following options are available: Position: Has no effect. Rotation: Has no effect. Scale: Has no effect. Sensitivity: Default is 1. Lower values are less sensitive and higher values are more sensitive – in the say way as for the joystick control. Control Style: has these options: o Absolute: similar to absolute on the joystick control. Moving the device off center will move the Character to a given location on screen. o Relative: The more you tilt from the center position in any direction, the faster the character will change to move in that direction. Control Type: o Move: tilting will move the Character. o Rotate: tilting will rotate the Character. Tiling up or right will rotate right, and tilting left or back will rotate left. Copyright © 2015 - Buildbox.com 34 Buildbox™ User Guide Labels To add a label, drag the button down the left of screen. You will see on the right of screen a very similar set of options as for the buttons: The only extra option is Tracking – which determines padding between characters. Action determines what will be displayed by the label. Available values are: User Text: this will allow custom text by filling out this box: o Text: the custom text to display. Best Score Amount: player’s best score. Coins Best Session: most coins collected in a play. Coins Amount: total coins available to spend on this device. Score Amount: current player score. Best Score Amount: best score that has been achieved on this device. Coins per Session: average coins earned per playing session. Copyright © 2015 - Buildbox.com 35 Buildbox™ User Guide Font Editor This screen is where you set the font used in labels throughout your game. The fonts available are all fonts installed on your computer, so if you want more fonts for Buildbox™, just install them as per normal on your computer. After selecting your font, you can then set the following options: Name: internal name for your reference only. Font Name: as above. Font Size: how big the font is. Shadow Offset(x and y): if either value is not zero, and Draw Shadow is selected, a shadow will appear. Canvas size: size of the sprite sheet used for font. Padding: how much space in pixels between each letter. Stroke Width: The edge of the fonts will be drawn with a pen of this width, if Draw Stroke is selected. Main Color: main color of the font. Gradient Color: color to fade to from main, if Draw Gradient is selected. Stroke Color: Color if the font outline if Draw Stroke is selected. Shadow Color: what color the shadow should be, if Draw Shadow is selected. Draw Shadow: if selected a drop shadow will be drawn. Draw Gradient: if selected a gradient will be drawn on the font. Copyright © 2015 - Buildbox.com 36 Buildbox™ User Guide Collision Shape Editor The collision shape could be said to the most important part of your game, as without them, you came cannot function. They are used every time your game kills an object, bounces an object, or even just stops an object. All these things happen when two game element's collision boxes collide, or when an object's collision box collides with the game boundary. What is NOT used for any of these things is the sprite image itself - this gives great flexibility to you as the game designer. Altering an object's collision box is very similar to editing your game's boundary, though it is more flexible. You can change a collision box by clicking and dragging and dropping any of the points (shown as small circles) that define it. At the top of screen are several elements to help you: Shape: o Polygon: collision box can have effectively unlimited points. o Circle: the simplest collision box to define. You can make this bigger and smaller and it will remain a circle. (One-way collision): turn on or off the one-way collision option – which turns on a green pointer. This can be seen in the above screen-shot. To change the direction of the one-way collision click and drag on the end of the arrow. The direction the arrow is pointing, is the direction that the player’s Character will be able to pass through the collision box. (Add): select a point, and click this button, and a new point will be added next to your selected point. (Remove): select a point, and click this button to delete the selected point. Copyright © 2015 - Buildbox.com 37 Buildbox™ User Guide (Reset): reset the collision box to the original "best guess" that Buildbox™ made when importing the PNG file. (Zoom): change the zoom level of the viewer. Notes: You cannot have a convex collision box. Don't worry if you are unsure what this means, as Buildbox™ will not let you create a convex box, and will turn the box red to warn you if you do so by accident. If you need a convex box, you should first consider if you really need one. If you are still convinced, you may want to look at Connections to create a composite object. Collision boxes for Characters will usually be a bit smaller than the visible boundary of the character for better playability. If too big you run the risk of the user feeling cheated when they get killed and think your game unfair. For lower CPU usage, keep your collision boxes as simple as you can. Copyright © 2015 - Buildbox.com 38 Buildbox™ User Guide Project Settings General Here is where you configure the details needed for submitting your game to the various app stores. The very top of the window is a menu selection bar that highlight the current - General - screen in yellow. Click on Gameplay or Advertisements to go to those screens. At the top of screen, below the menu selection bar, you will a drop-area for the game icon. To set your game icon, drag and drop a PNG file. The file will be resized automatically for each platform. The advanced image options screen is accessible from this box. This screen is designed in such a way that you save settings for multiple different app stores (/device types). To look at each of these, click the Application Store drop-down and change the displayed app store. When you export a game for an app store the corresponding settings are used. The following settings are available: Full Game Name: the name of the game. Game Version: the game version. This is used for version control when submitting updates to app stores. Copyright © 2015 - Buildbox.com 39 Buildbox™ User Guide Score Type: o Distance: The default value. Scoring is based on distance travelled, only. o Coins: Scoring is based on collecting Action items that have a coins value. Ie your scoring is the same as your coin collection. Reset Message: This is the confirmation message shown when somebody presses the Reset Game button. Comments: your private notes only. Will not appear in the published game. Application Store: displayed settings are for this app store. For available options, see list of Exportable App Stores. Bundle ID: A unique identifier that gets embedded into the app and must be unique within a single app store. Usually in the form of com.short-company-name.short-game-name. Full Game Name on Device: a short name that will be displayed on the device, once the game is installed. This will appear under the game icon. If the this is too long to display, the device will usually abbreviate the middle of it by using ".." Review Link: link within the app store that will take the player to a page on the app store where your game can be reviewed. Leaderboard ID: the code-name of the leaderboard. This is what you setup in Apple's Itunes Connect so the game can use it. Share Message: the message to show to the user when prompting to share the game. If you want to show the players' score in this message you can insert the special tag "[[SCORE]]" into your text. If you want this message to be useful, you will need to put in a link. If you are pushing to multiple platforms, you may want to make this link go to a web pages instead of an app store (perhaps their friend has a different kind of device). Licence Key: Google play only – signing key from the game on Google Play. Google Play ID: If using Google Game Services (leaderboard) then you grab the ID from setting the game up for Google Game Services. Copyright © 2015 - Buildbox.com 40 Buildbox™ User Guide Gameplay The very top of this window is a menu selection bar that highlight the current - Gameplay - screen in yellow. Click on General or Advertisements to go to those screens. Gameplay Preset The following presets are available: <Custom> Default Avoidance Touch Move: avoidance game. Drag character around screen or use arrow. Avoidance Latter: as above but cannot move vertically like The Line. Avoidance Wide: like On the Line. Side Shooter: classic space shooter game where enemies come from the right and there is no gravity, like R-Type. Impossible: like the Impossible Game where game scrolls from right, and only user control is jump. Motocross: side-scroller like Road Trip 2. Copyright © 2015 - Buildbox.com 41 Buildbox™ User Guide Shooting Runner: sideways running game, with shooting, like Robot Unicorn Attack. Runner: sideways running game like Canabalt. Platformer: as Runner but the background/level will not move unless the character is moved by the player, like Cloudberry Kingdom. Downward Bounce: like Jupiter Jump, where player jumps down when button pressed. Sticky Jump: like Spike Dislike. Helicopter: like Jetpack Joyride or similar. Flappy: like Flappy Bird or similar. Jumping: like Twee Jump or Jump Pack. Jump up the platforms. Racing: classic vertical car racing game like Spy Hunter Dogfight: vertical shooting game. 360 Shooter: space shooter where you can shoot in any direction like Smash TV. Orientation: Portrait or Landscape. Only has an effect on mobile devices - ie not TVs and PC and Mac screens, given they are rarely used sidways! Copyright © 2015 - Buildbox.com 42 Buildbox™ User Guide Game Frame Settings The very top of section window is a menu selection bar that highlight the current section in yellow. The game frame shown, above, determines where the player can move in the game field, and what happens when the player tries to move out of that boundary. To move or resize, click and drag on the circles in the corner of the box. There are three actions that can occur when the boundary is hit by the player, shown by three colors: Pass(grey) - pass through and keep moving. Block(yellow) - prevent the player from moving through the boundary. Defeat(red) - kill the player on contact. Advanced Gameplay Settings Please see the Advanced Game Settings chapter in the Advanced section. Keyboard Key Binding This is where you can customise what keyboard-keys are used to control your game, on PC, MAC or other device where you may have a keyboard available. The fields themselves are rather self-explanatory, and are explained elsewhere. To change a key from its default setting, just click on a given field, then press a key on the keyboard. You cannot at this time use modifier keys like [SHIFT], [ALT] or [CMD], or any of the numeric keypad keys, or [PRT SC] (print screen). If you want to remove a control completely, press the [BACKSPACE] key and it will change to “Not Assigned” Copyright © 2015 - Buildbox.com 43 Buildbox™ User Guide Advertisements The very top of this window is a menu selection bar that highlight the current - Advertisements screen in yellow. Click on General or Gameplay to go to those screens. There are several sets of options set to set on this screen, which you get to by changing the value of Application Store. Screen-shots of each of these are to follow. Note: the ad networks compiled into your game are NOT determined by these screens. They are determined by the ad networks you select for the game screens - see Menu Overview. Apple iOS App Store Fill out details for whatever advertising company you will be using. As you can see, there is a wide selection. Apple Mac App Store There are no ad networks supported on Mac desktops. Copyright © 2015 - Buildbox.com 44 Buildbox™ User Guide Google Play Store Fill out details for whatever advertising company you will be using. Amazon App Store Fill out details for whatever advertising company you will be using. Copyright © 2015 - Buildbox.com 45 Buildbox™ User Guide Microsoft Windows Marketplace The only advertising company supported on Windows (desktop) is Leadbolt. Copyright © 2015 - Buildbox.com 46 Buildbox™ User Guide Preview There are only a few controls for this screen. The buttons/options from left to right are: Debug mode: show collision boxes in various colors (like the screen shot, above). Full-screen: set to full screen. Works well if you have two monitors - once for the editor and one for preview. Take Screen-shot: save an image from the simulator and save to desktop. Set specific screen size: (self explanatory) o 1136x640 - iPhone5 o 960x640 - iPhone4 o 1024x768 - iPad2 o 1920x1080 - Full HD And on the top right is the restart button. Pressing this is like closing the window and opening it again. Copyright © 2015 - Buildbox.com 47 Buildbox™ User Guide Atlas Editor This is an advanced screen provided to edit the atlas/sprite sheet files that will let you tweak them. The most important thing you can see on this screen - for the non-advanced user - is how many Atlas sheets you can see. The more of them, the bigger your exported games will be. In general, smaller is better - for memory use and download size of the app. On the left is the list of atlas files. When you click on them, you can edit the advanced options on the right. These are: Name: name of the atlas file. Width: width in pixels. This must be a base-2 number (eg 256,52,1024,2048...) Height: height in pixels. This must be a base-2 number (eg 256,52,1024,2048...) Padding: how many pixels space between individual sprites. A value of 0, may generate artefacts in your sprites edges is not recommended If you want to move sprites to another atlas file, just click and drag the image to another atlas on the left side of screen. To create a new atlas file, press the [Add Atlas] button ow the bottom left. To optimise or rebuild the currently selected atlas file (after removing or adding some images press the [Optimise] and [Rebuild] buttons respectively, on the bottom right. To optimise all atlas files, press [Optimise Atlases] on the bottom left. Copyright © 2015 - Buildbox.com 48 Buildbox™ User Guide Buildbox™ Menu Summary Most menu functions are available from buttons elsewhere in Buildbox™. Here is quick summary in case you are feeling a bit lost on some of them. File New: abandon the current project (BBDOC file) and create a new one. Open: abandon the current project and create a new one. Open Recent: show a list of recent project (BBDOC files) Save: save current project with its existing file name. Save As: save current project with a new file name. Export: export current project. This is what you need to do when you a ready to submit a game to an app store. When you click on one of the export options listed below, you will be asked for a location. o IOS (mobile) o Android (mobile) o Windows (desktop) o Windows EXE (desktop – needs no compile; unsigned; no ads) o Amazon (mobile) o OSX (desktop) About: show summary of your current Buildbox™ install, including current version installed. Note: exported projects will then need to be compiled in XCode, Visual Studio, or similar – with the exception of Windows EXE. Edit Align Scenes: layout all scenes in the time-line such that they will play one after the other. Stack Scenes: layout all scenes in the time-line such that they will are all in parallel. On play one of these will be randomly selected to show. Add New Character: create new character (currently on a single character supported for a game). New Object: create a new object. New Action: create a new Action. New Effect: create a new effect (light, trail or flag) Copyright © 2015 - Buildbox.com 49 Buildbox™ User Guide View Atlasses: Show the Atlas editor. Check for Updates: check to see if there is a new version of Buildbox™ available for download. Actual Size: change zoom level to actual size - neither zoomed in or out. Show All: change zoom to show entire scene. Show Simulation: open Preview screen – as if you had pressed the play button on the right. Debug Mode: show collision boxes in various colors. Linker Mode: show linker mode so connections can be set up. Snap Mode: turn on snap mode so that objects snap to locations on screen (easier to position objects). Lock Background: stop background from being selectable - preventing accidental background changes. Tools Remove Unused Level Objects: delete unused objects, Actions and effects. Remove Unused Image Objects: delete unused PNG files. Remove All Sound Objects: remove all sounds from project. Convert to Clones: see Convert to Clones in Advanced Section. Help Buildbox Documentation: Open a web browser and show the main documentation page. Get Logs: support may as you to send them logs. Press this and you will find a log file on the desktop, ready to send to support. Activate Licence: use this to turn your demo software into a fully licensed product. Copyright © 2015 - Buildbox.com 50 Buildbox™ User Guide Advanced Motors Motors are a setting that relates to Connections. If you want the background on this, you should read that first. Click on the line between two points, and you can set the options for the join. These options let you get objects moving as you can see from these: Speed: top speed of object around the parent pivot point. Positive numbers will move clockwise. Torque: how much circular force is used around the parent pivot-point. Button Activated: if ticked, this will only activate when the motor rotate buttons are pressed. Usually this is used on objects attached to the player character, however they can be used anywhere. Convert to Clones This is a high level game optimization. No need to mess with this unless you have already optimized other things like image sizes, number of atlases, etc, and are still looking to make things even smaller and more efficient. If you have many of the same objects in your game, all with the same properties (ie same size, etc) you can select one of them and select Convert to Clones from the tools menu. It will remove a ton of duplicate data and just store the duplicate objects as clone of the root object. Only the position, rotation and scale will be saved. The "root" object will contain the other settings which will affect all the clones automatically. Copyright © 2015 - Buildbox.com 51 Buildbox™ User Guide Advanced Game Settings The very top of section window is a menu selection bar that highlight the current section in yellow. Click on Advanced Gameplay Settings bring up this section. This section shows all the settings that are set whenever you change to a Gameplay preset, at the top of the window. X values are in the left-right directions, and Y values are in the up-down directions. The Character settings are: Max Speed (x and y): max speed the character can move in. Bounce Force (x and y): force the Character will exert on another object. Note: values here will constrain the movement of the player in an unrealistic way - eg with a vertical bounce force, hitting an angled surface will bounce you straight up and not sides - usually this is what you require. That is why there is an X and Y value to specify. If you require more standard physics for your bounce, leave this at 0,0 and put a value for World Bounce force. Also this will not affect objects attached to the character. Copyright © 2015 - Buildbox.com 52 Buildbox™ User Guide Jump Force (x and y): force on character when you press the jump button. Jump Timeout: how long to wait after jump counter is full, till jump is available again. Jump Counter: how many jumps can be made before waiting for Jump Timeout Ground Threshold: Detection of ground is used for allowing Jump. If you have platforms with angles the character may sit across, it may be too far above ground to jump – even though parts of the character are still on the ground. You can fix this by increasing this value. Jump from Ground: can the player jump off the the game-field boundary. Right Lean Force: force that will lean/rotate character right when lean-right button pressed. Left Lean Force: force that will lean/rotate character left when lean-left button pressed. Platform Friction: friction force that will stop character sliding against platforms. Note: this will not affect objects attached to the character. Rotation Drag: force that will slow down any rotation of the character. Air Drag (x and y): force that will slow down the character's movement over time. Direct Movement: when checked, character can be moved around the screen by directional controls. Forced Movement: if ticked, them a movement of the background will force the player character to move – keeping it in the same position on screen. If not ticked, then the character – unless being moved by the person playing the game – will stay fixed on the scenery, causing it to move toward the edge of the screen. Fixed Rotation: player will not rotate no matter what happens. Image Direction: point character in the direction of movement. The World settings are: Gravity (x and y): continuous force acting on everything as gravity does in the real world. Time Warp: how long to wait before adding 'speed increase' to the current game speed. Game Speed Min: start speed at which game will move past the player (regardless of player movement). Game Speed Max: final maximum speed at which game will move past the player (regardless of player movement). Speed Increase: amount to add to speed increase. Friction: friction between all objects. Velocity Drag: force used to slow anything that is moving down. Directly opposes all movement unlike air-drag for character, though very similar. Bounce: bounce force between all objects Copyright © 2015 - Buildbox.com 53 Buildbox™ User Guide Score Multiplier: Scoring is 1 point per pixel moved. A value here will increase that. Eg value of 10 will mean 10 points per pixel. Game Direction: In clock-wise degrees where 0 has the character moving left. -90 will be moving up, 90 will be moving down, and 180 will mean moving left. Advanced Image Options Move your mouse over a image box, and you will see a pencil and "X". To delete the image currently in the box, press the "x" however to access the advanced image settings screen click on the pencil. You will see a screen like this: The first thing to note, is the top-left, which allows you to select what image you wish to alter. By default the image that you came from will be selected, but you can edit any image currently loaded into the project (Note: changing the selected image and making an edit will NOT change the image you came from - it will edit whatever image you changed to). All instances of the selected image will be changed by what you do on this screen. You can edit the following image properties: Name: name used internally within Buildbox™. Brightness: brightness of the image, from -6 to 1 where 1 is the brightest(/white). Contrast: contrast of the image, from -1 to 1 where 1 has the most contrast and -1 as the least. Hue: If not 0, will put a color-cast to the image. Values between -2 and 1.5. Saturation: Sets the richness of the color. Values between -2 and 1, where -1 is completely washed out and 1 is completely saturated. Opacity: Sets how transparent the image is. Values between 0 and 1 where 0 is completely transparent and 1 is completely opaque. Copyright © 2015 - Buildbox.com 54 Buildbox™ User Guide By default all the values are 0 except for Opacity. To save changes press [Save] and to leave the screen - without saving - press [Close] How Do I... The biggest question the team in support get starts with "How Do I," so we wanted to devote a little time to answering some of these, and if possible give you all ideas on how to answer this question yourself. After all, when you are "in the zone" you don't really want to wait for anything - let alone for support to reply. Buildbox™ is a very flexible system, in which case there may be more than one way to do what you are trying to do. You may find flicking through this manual may give you an idea. Probably the biggest tip that can be offered is to try NOT to look at items in Buildbox™ as they are defined. Think laterally. What happens when you take an item out of its usual operating location and put it somewhere else. An example of this are links and attachment motors. Now they are designed for use in creating vehicles that are driven by wheels. If you look up the wheel motors in this manual you will see the example given is completely diverse from that. This was done with the purpose of helping the reader look at things more flexibly. So to get you going, what are some things you can do with these links and motors, aside from a motorcross bike? unicycle: attach one wheel to the character. Launcher: set up two rows of wheels, each side set to turn in opposite directions. Put each row evenly apart, and put an object to be launched in the barrel created. Make all the motors button triggered. When the user presses the button down, the projectile will be launched. Walker: make a stick with its pivot up one end (ie not in the center). Attach two of these to the character, with opposite turn directions. The player can move the character around by pressing both turn buttons one after the other. Gripper arms: give your character gripper arms by using two sticks as above, and mounting them parallel to each other, and set them to turn in opposite directions. Now one turn button will cause the gripper arms to grip, and the other button will cause the arms to move part. Trigger an Event on the Other Side of the Screen? Put in a transparent prop that holds up whatever it is on the other side of the screen, but which the player can run into. Set it to move at high speed off the screen when touched. Enemy That Dies on Player Contact This is here to show you an alternative way of doing things. Now of course you can kill enemies on contact by using Strike, however you can achieve a similar effect by doing the following: Drag in enemy sprite as an Action, with type coin and a value of 0. Set Start animation as the enemy death animation. Copyright © 2015 - Buildbox.com 55 Buildbox™ User Guide Make a Swinging Object This was alluded to in the linked objects section. This is what you need to create: Create a fixed object "A" Create a physics object "B". Recommended set to collision type - no-collide (or shape will stop free movement as it is at the elbow) Draw a connection from object "A" to "B" Create a physics object "C" Add a connection from object "B" to "C" Object "C" will swing if you have it start high enough, as acceleration due to gravity kicks in. Design Mode Preview mode Action with Physical Behaviour You cannot set an Action to have physical properties or movement. You can, however, attach the Action to an Object that has those properties. 1. Create an object. 2. Give it whatever physical and/or movement properties you want. 3. Optionally make the object invisible (by using a transparent PNG for the object image) 4. Add the Action. 5. Join the Object to the Action. Note: you may make the Action impossible to pick up as the object cn be in the way. Hence you may wish to offset the Action from the object. Copyright © 2015 - Buildbox.com 56 Buildbox™ User Guide Make a Swinging Axe An example of this is found in one of the sample games. To do this you just need to adjust the anchor point in the animation editor. Open the animation editor like this: Then drag the image around to adjust the anchor point: Copyright © 2015 - Buildbox.com 57 Buildbox™ User Guide Kill Enemies by Jumping on Their Heads For every enemy that you want to be able to kill by the character jumping on it: place a Strike Action - with a transparent PNG. Any animation should be single-play. Use a link to attach the Action to the enemy. Short duration - definitely less than a second. So what this means is as soon as the character lands on the enemy's head, it picks up and triggers the Strike which kills the enemy. Copyright © 2015 - Buildbox.com 58 Buildbox™ User Guide Online Training Videos Overview Videos Overview Making your first game Creating a physics game Make a game in 60 seconds Basic Functions User interface Choosing and editing game-play Adding assets Asset bar Copyright © 2015 - Buildbox.com 59 Buildbox™ User Guide Building and Editing Character asset bar Character asset advanced options Object basic options Object advanced options Background options Action basic options Action advanced options Sub assets Sub asset object type Sub asset advanced options Scene Editor Scene Selection Bar Copyright © 2015 - Buildbox.com 60 Buildbox™ User Guide Advanced Functions Connections Effects Game-play and Settings Game-play settings General settings Advanced character game-play settings Advanced world game-play settings Font editor Menu bar settings Copyright © 2015 - Buildbox.com 61 Buildbox™ User Guide Menu and Preview Menu screen overview Menu screen editing Game preview Copyright © 2015 - Buildbox.com 62 Buildbox™ User Guide The Basics Drag and Drop Perform a drag and drop by having both the source and destination visible on screen (for an image file, the source would be a Finder/Explorer window). Move the mouse over the source, press the left mouse button down and hold it. Now drag the mouse to the destination, and let go of the mouse button. PNG File A type of image file. Supports transparency and various amounts of colors. Lower color settings will mean a smaller PNG file. PNG Drop Box A box where you can drag and drop a PNG file. Once an image is added, you can remove it by pressing the x and access the Advanced Image Options by clicking the pencil. You can drop multiple PNG files at once onto some PNG Drop Boxes, creating an animated sprite(/image). MP3 File An audio file that uses lossy compression. Lowering the quality settings of the file before import will make the file smaller. Exportable App Stores The following app stores are supported: Apple iOS App Store - Mac mobile devices including iPhones and iPads. IAP supported. Apple Mac App Store - Mac OSX desktop. Google Play Store - Default Android app store. IAP supported. Amazon App Store - Amazon Kindle and Kindle TV. Microsoft Windows App Store - Windows desktop. Image Scaling Scaling an image in Buildbox™ is very useful, however you should consider the following before using it too much: Scaling an image down all the time means that your final game will be downloading, storing, and loading into memory, a large image on the device, for no benefit - the extra detail is being thrown away by shrinking the image on screen. Scaling an image up too much will result in blurry edges which can make your game look bad. This is not always bad though depending on how you are using the image and you may want to consider it for optimising your stored atlas sizes. For example if you are using a 1x1 pixel grey image and scaling it up to completely cover the screen, no blurry edges will be seen. Copyright © 2015 - Buildbox.com 63 Buildbox™ User Guide Atlas / Sprite Sheet A sprite sheet or atlas is a tool used behind the scenes in computer games to save both run-time memory use on a device, and storage space. An abbreviated, non-technical description follows. Storage Space Every PNG file has "header" information about how big the image is and the like, and then the image data itself. If we assume that every PNG file you have is 2% header information, and we have 25 images, then we are using 25.5 image worth of storage to store those files. If we take those 25 images and stack them all next to each other (a bit like a photographer's contactsheet) then we will have a single PNG file with almost no wasted "header" information, saving the half an image's worth of space. You can manually create sprite sheets using a tool like Photoshop and a lot of manual work, however Buildbox™ does this for you automatically. Device Memory Without going into the reason why, any image stored in memory can only put into a box that is a size that is a power of 2 (2,4,8,16,32,64,128,256,512...). Now if we have an image that is 300 pixels wide and 100 high, it would be stored in a box of size 512 pixels wide and 512 pixels high which would mean 88% wasted memory for just that one image. Start using a lot of those single images and your game may perform terribly, or not run due to lack of memory. Sprite sheets fill the entire storage box in memory, and inside IT you can cram as mans images as possible, resulting in very little wasted memory. Sometimes - with more technical work that we will go into here – none at all. Copyright © 2015 - Buildbox.com 64 Buildbox™ User Guide Color-Picker This screen is rather self explanatory. The easiest way to use this screen is to click in the box on the top-right, and then set the color brightness/darkness with the slier on the far right. If you want a transparent color, set the Alpha Channel to a value less than 255. Animation Editor The screen has several components. The main image area, where images can be moved around the sprite pivot point (the dot in the very centre), and the advanced options panel on the right - which are defined per each image you have. On the bottom you can see the animation panel itself, with these buttons/fields from left to right: Play: start and stop the animations Frames: number of animation frames. (the screenshot shows 9) If you have animated sprites that have less frames than this value, they will repeat as required. Copyright © 2015 - Buildbox.com 65 Buildbox™ User Guide Animation Speed: how fast to play animations. A value of 1 - the default - I about 30 frames per second, with values between 1 and 0 being slower, and values above 1 being faster. The options - per image/image set - are: Name: for internal reference only. Position: where the images are in relationship to the centre point. You will see these change as you drag the image around the window. Rotation: what angle the image is rotated to. Image: this is a PNG Drop Box. If you want to use an animated image, you can drop several PNG files at once, here. Autohide: hide after how many seconds. Stick to Edge: if this object is scaled, having this object ticked will mean the object stays where it is relative to the side, instead of the centre. Notes: moving images around in a multi-framed animation will not allow individual movement per frame. Wherever you move them to, is where they will stay for the entire animation. if you edit images on this screen, it will not alter the objects'(/characters'/etc) collision box. Drag-Drop New Image/Animation If you want to add another image - possibly animated - then just drag and drop a png file (or collection of png files) onto the main editing area, as you can see, above. When you press the animation play button down the bottom-left, you will see them both animate. Copyright © 2015 - Buildbox.com 66 Buildbox™ User Guide Advanced: Physics Objects You can drag and drop Objects from the main Buildbox™ window. This will bring in all the standard object settings, instead of just an animated or fixed image. The screenshot shows an example of an object, and the options available on the right. For details of what you can do you should look at the section on Objects settings. Here are some ideas however to get you started: Character death animation as per the game, Phases: put in several separate "chunks" of the character, and give them physics properties including velocities. Objects that spawn: could be interesting weapon effect if added to shooting animation or bullet animation - providing a different look or additional objects that kill a bit like a cluster bomb. Exploding objects on jump: A rocket particle-like effect when the character jumps. ... your imagination is the best idea source! Copyright © 2015 - Buildbox.com 67 Buildbox™ User Guide Export/Compile Checklist Do you have: 1. 2. 3. 4. 5. 6. 7. 8. 9. An app icon? A bundle ID for your app store? An app full-name and device-name? Leaderboard ID (if using Game Center)? Google Play ID (if using Google Game Services)? A share message (if using Share feature)? A review Link (if using a Review button)? Ad network settings (if showing ads)? Checked that ad networks selected on screens are available for your selected app store (most ad companies are only available on some platforms)? 10. Do you have a licence key? (for Google Play or similar) Copyright © 2015 - Buildbox.com 68 Buildbox™ User Guide Index Actions..4, 6, 7, 8, 16, 17, 18, 23, 24, 27, 29, 30, 31, 33, 35, 40, 43, 49, 50, 55, 56, 58, 60 Available ....................................................31 Activate ................................................... 23, 51 Actual Size .....................................................50 Ad Networks...................................... 27, 44, 68 Adding ....................... 15, 37, 48, 53, 59, 63, 67 Advanced..5, 6, 12, 18, 39, 43, 48, 50, 51, 52, 54, 60, 61, 63, 65, 67 Advertising..5, 27, 30, 33, 39, 41, 44, 45, 46, 68 Advertising Company ........................ 44, 45, 46 Asset Bar ............................................. 8, 13, 60 Assets ...................................... 8, 13, 18, 59, 60 Advanced .................................................. 60 Atlas Editor ............................................... 5, 48 Atlas Files ...................................................... 48 Atmosphere .................................................. 20 Attach.......................................... 19, 55, 56, 58 Attached ............... 7, 12, 14, 19, 21, 51, 52, 53 Autohide ................................................. 30, 66 Automatically .................................... 39, 51, 64 Affect ................................................. 51, 52, 53 Available..9, 20, 21, 29, 30, 31, 33, 34, 35, 36, 39, 40, 41, 43, 49, 50, 53, 67, 68 Air Drag .........................................................53 Avoidance ..................................................... 41 Amount ................................. 13, 15, 31, 35, 53 Awake ..................................................... 13, 15 Anchor Point .................................................57 Away ....................................................... 15, 63 Android ............................................. 33, 49, 63 Back................................. 22, 23, 25, 31, 33, 34 Angle ................................................. 21, 30, 66 Back Button................................................... 33 Animation..6, 10, 13, 18, 21, 31, 55, 57, 58, 63, 65, 66, 67 Background ............. 4, 9, 27, 42, 50, 51, 53, 60 Animation Editor ..................... 6, 10, 13, 57, 65 App / Game..4, 5, 6, 7, 9, 10, 11, 14, 17, 18, 20, 25, 26, 27, 30, 31, 32, 33, 36, 37, 38, 39, 40, 41, 42, 43, 44, 45, 48, 49, 51, 52, 53, 54, 59, 61, 62, 63, 64, 67, 68 App Stores..5, 30, 33, 39, 40, 44, 45, 49, 63, 68 Apple ....................................... 5, 30, 40, 44, 63 Area ................................... 9, 24, 30, 39, 65, 66 Arms ..............................................................55 Arrow ................................................ 22, 37, 41 As Above ................................................. 36, 41 Background Image .......................................... 9 Bad ................................................................ 63 Banner........................................................... 27 Base............................................................... 48 Based ...................................................... 15, 40 Basic ........................................ 6, 15, 17, 59, 60 Basic Value .................................................... 15 Be Added................................................. 15, 37 Behaviour ............................................ 6, 18, 56 Best ............................................... 9, 35, 38, 67 Best Score ..................................................... 35 Copyright © 2015 - Buildbox.com 69 Buildbox™ User Guide Better ................................................ 20, 38, 48 Bigger .................................... 15, 20, 21, 37, 48 Biggest ...........................................................55 Bit ................................................ 38, 49, 64, 67 Blurry Edges ..................................................63 Bottom ............................ 11, 19, 21, 48, 65, 66 Bottom Left ...................................................48 Bottom Right .................................................48 Bounce .................................. 14, 19, 42, 52, 53 Bounce Force .......................................... 52, 53 Boundary ..................................... 37, 38, 43, 53 Box..10, 15, 18, 19, 21, 30, 35, 37, 38, 39, 43, 54, 63, 64, 65, 66 Character..4, 8, 10, 11, 12, 14, 15, 17, 18, 20, 21, 23, 24, 25, 27, 31, 32, 33, 34, 35, 37, 38, 41, 42, 49, 51, 52, 53, 54, 55, 58, 60, 61, 66, 67 Animation ................................................. 18 Char ..................................................... 31, 32 Char Move ................................................ 32 Char Rotate ............................................... 31 Right .................................................... 25, 53 Up.............................................................. 25 Checkpoint .............................................. 17, 32 Circle ....................................................... 37, 43 Classic...................................................... 41, 42 Clicking ........................................ 10, 14, 37, 63 Box Collides ............................................. 15, 37 Clockwise .......................................... 15, 32, 51 Boxes ................... 20, 26, 27, 37, 38, 47, 50, 63 Coin Shop ...................................................... 32 Boxes In ................................................... 47, 50 Coins ......................... 17, 18, 30, 32, 35, 40, 55 Brightness ............................................... 54, 65 Collection .............................. 17, 18, 35, 40, 66 Bullet ........................................... 10, 14, 24, 67 Collision..5, 7, 10, 13, 15, 17, 20, 37, 38, 47, 50, 56, 66 Button Action ...................................... 4, 31, 33 Button Down ............................... 35, 55, 63, 66 Button Pressed .................................. 16, 42, 53 Buttons..4, 7, 9, 12, 16, 17, 22, 26, 27, 28, 29, 30, 31, 33, 35, 37, 40, 42, 47, 48, 49, 51, 53, 55, 63, 65, 66, 68 Came ....................................................... 37, 54 Camera .................................................... 11, 18 Camera Flash ........................................... 11, 18 Centre.......................................... 12, 15, 65, 66 Centre Point ............................................ 15, 66 Chance..................................................... 18, 22 Box ........................ 15, 20, 37, 38, 47, 50, 66 Convex Collision Box ................................ 38 Shape .................................. 5, 10, 13, 17, 37 Type ................................................ 7, 15, 56 Colors ........ 6, 20, 22, 36, 43, 47, 50, 54, 63, 65 Command ............................................... 23, 24 Company ............................... 30, 40, 44, 45, 46 Compiled ................................................. 44, 49 Computer ................................................ 36, 64 Connection ........ 4, 7, 12, 24, 38, 50, 51, 56, 61 Connection From .......................................... 56 Copyright © 2015 - Buildbox.com 70 Buildbox™ User Guide Connection Mode ........................................... 7 Delete.......................................... 24, 37, 50, 54 Constrain ................................................. 23, 52 Description .............................................. 31, 64 Contact .................. 5, 12, 14, 15, 17, 43, 55, 64 Designed ................................................. 39, 55 Continuously ........................................... 18, 27 Desktop ................................. 46, 47, 49, 50, 63 Contrast.........................................................54 Destination ....................................... 12, 26, 63 Controls..4, 12, 23, 25, 28, 30, 33, 34, 39, 41, 43, 47, 53 Destroy.......................................... 7, 12, 15, 17 Controls For...................................................47 Copies ............................................................14 Details ..................................... 7, 39, 44, 45, 67 Determined By ................ 15, 31, 33, 35, 43, 44 Corner ...........................................................43 Device..6, 32, 33, 34, 35, 39, 40, 42, 43, 63, 64, 68 Counter ................................................... 32, 53 Diagram................................................... 22, 26 Create..4, 8, 12, 13, 14, 27, 30, 33, 38, 48, 49, 56, 64 Direction.. . 9, 15, 19, 20, 33, 34, 37, 42, 53, 54 Create New ..................................... 4, 8, 13, 49 Created.............................................. 13, 30, 55 Creating ............................................. 55, 59, 63 CTRL...............................................................23 Current Project..............................................49 Current Scene............................................ 8, 13 Current Section ....................................... 43, 52 Damage ............................................. 12, 13, 15 Darkness .................................................. 20, 65 Death ........................... 5, 10, 11, 13, 17, 55, 67 Death Animation ..................................... 55, 67 Debug Mode .................................................50 Decoration .............................................. 14, 24 Directions ................................................ 52, 55 Disabled ............................................ 15, 23, 33 Display....................... 11, 27, 32, 33, 35, 39, 40 Distance ................................ 15, 16, 19, 21, 40 Distort ............................................... 19, 20, 21 Distort The ........................................ 19, 20, 21 Do Nothing .................................................... 17 Download................................................ 48, 50 Drag And ............... 8, 12, 18, 26, 39, 63, 66, 67 Draw........................................................ 36, 56 Draw Gradient .............................................. 36 Draw Shadow ................................................ 36 Draw Stroke .................................................. 36 Drop Box ..................... 6, 10, 18, 19, 21, 63, 66 Defaul..t10, 13, 22, 34, 40, 41, 43, 54, 55, 63, 66 Duplicate ........................................... 23, 24, 51 Default Animation ................................... 10, 13 Duration .................................................. 18, 58 Defined .................................. 14, 31, 37, 55, 65 Edge ............................................ 30, 36, 53, 66 Degrees ....................................... 15, 18, 21, 54 Edge Of.............................................. 30, 36, 53 Copyright © 2015 - Buildbox.com 71 Buildbox™ User Guide Edges ....................................................... 48, 63 Flash ........................................................ 11, 18 Edit ........ 5, 9, 10, 12, 13, 26, 27, 48, 49, 54, 66 Font ......................................................... 31, 36 Editing ........................... 6, 8, 37, 59, 60, 62, 66 Force ................................................. 51, 52, 53 Editor..4, 5, 8, 10, 13, 20, 22, 23, 25, 27, 28, 36, 37, 47, 48, 50, 57, 60, 61, 65 Forward ................................................... 23, 25 Frame ................................................ 43, 65, 66 Effect..9, 11, 18, 20, 21, 23, 24, 33, 34, 42, 49, 55, 67 Friction .......................................................... 53 Enemies ................................... 6, 17, 41, 55, 58 Full Screen............................................... 30, 47 Enemies On ............................................. 17, 55 Fully................................................................. 9 Enemy ......................... 5, 14, 15, 21, 24, 55, 58 Function .................................................. 30, 37 Example ............... 20, 22, 26, 30, 55, 57, 63, 67 Functions ...................................................... 49 Export .................................. 3, 6, 27, 39, 49, 68 Game Exportable App.................................... 6, 40, 63 Boundary................................................... 37 Exported .................................................. 48, 49 Direction ..................................................... 9 Field ..................... 14, 27, 30, 31, 32, 33, 43, 53 Field .................................................... 32, 43 File..5, 6, 8, 10, 26, 28, 30, 38, 39, 48, 49, 50, 63, 64, 66 Frame ........................................................ 43 Image ........................................................63 MP3 ...........................................................26 File Name ......................................................49 Files Atlas ................................ 5, 6, 48, 50, 63, 64 PNG..6, 8, 9, 10, 18, 19, 21, 28, 30, 38, 39, 50, 56, 58, 63, 64, 66 Files At ..................................................... 63, 66 Fill ............................................................ 30, 64 Final Game ....................................................63 First Object ....................................................12 Fixed ............................................ 12, 53, 56, 67 Flag .......................................................... 21, 49 Flappy ............................................................30 Icon ..................................................... 39, 40 Speed ........................................................ 53 Gameplay .......................................... 17, 31, 33 Games ............................................... 48, 57, 64 General ................................. 39, 41, 44, 48, 61 Gradient ........................................................ 36 Gravity......................................... 11, 41, 53, 56 Gripper Arms ................................................ 55 Hand........................................................ 10, 23 Header Information ...................................... 64 Height ........................................................... 48 Hidden Button .............................................. 30 High ........................... 15, 19, 21, 51, 55, 56, 64 High Each ................................................ 19, 21 Highlight .......................... 31, 39, 41, 43, 44, 52 Copyright © 2015 - Buildbox.com 72 Buildbox™ User Guide Highlight The ......................... 39, 41, 43, 44, 52 Internal ........................... 10, 13, 17, 30, 36, 66 Highlighted .......................................... 9, 12, 22 Internal Name ................................... 10, 30, 36 How Big ................................. 18, 20, 33, 36, 64 Internal Reference ............................ 13, 17, 66 How Fast ........................................... 19, 21, 66 Into The ............................................. 40, 54, 64 How High ................................................. 19, 21 Into Your ................................................. 40, 44 How Long .......................................... 19, 21, 53 Item ............................. 8, 12, 19, 20, 21, 30, 55 How Many ................................... 18, 48, 53, 66 Items ....................................................... 40, 55 How Much ......................................... 15, 36, 51 Its Pivot ................................................... 15, 55 How To .................................................... 14, 55 Jump.......................... 16, 25, 30, 31, 41, 53, 67 How Transparent ...................................... 9, 54 Jump Button............................................ 16, 53 How Wide................................................ 19, 21 Jump Counter................................................ 53 Icon.............................................. 30, 39, 40, 68 Jumping ................................................... 10, 58 Image Jumping On ................................................... 58 Advanced ............................................ 39, 54 Jumps ................................................ 42, 53, 67 Image Options ...............................................39 Keep .................................................... 9, 38, 43 Images ..................................... 9, 48, 64, 65, 66 Key .............................................. 22, 40, 43, 68 Impossible .....................................................56 Key On ..................................................... 22, 43 In Degrees ......................................... 15, 18, 21 Keyboard ........................................... 22, 30, 43 In Memory.....................................................64 Kill ............................. 14, 17, 21, 43, 55, 58, 67 In Pixels ..................... 15, 16, 19, 21, 22, 36, 48 Kill All ............................................................ 17 In Play ............................................................24 Kill Enemies ............................................. 17, 55 Including .......................... 14, 20, 26, 49, 63, 67 Kill The .............................................. 14, 21, 43 Increase ................................................... 53, 54 Killed ....................................................... 14, 38 Individual................................................. 48, 66 Kills .......................................................... 37, 58 Info ................................................................26 Labels ............................................ 7, 31, 35, 36 Install ........................................... 30, 31, 36, 49 Launcher ....................................................... 55 Installed ............................................. 36, 40, 49 Layer ........................................... 17, 21, 23, 43 Instances ........................................... 13, 18, 54 Layout ..................................................... 30, 49 Instances Of ............................................ 13, 54 Leaderboard.................................................. 40 Instead Of .............................. 16, 31, 40, 66, 67 Level ................................ 22, 23, 38, 42, 50, 51 Copyright © 2015 - Buildbox.com 73 Buildbox™ User Guide Level Will ................................................. 22, 42 Move Left ................................................ 32, 54 Light................................................... 11, 20, 49 Move Right.................................................... 32 Link .......................................................... 40, 58 Move Up ....................................................... 32 Linker Mode ..................................................50 Movement .......... 19, 21, 27, 33, 52, 53, 56, 66 Links ..............................................................55 Movement Will ....................................... 19, 21 List ......................................... 23, 31, 40, 48, 49 Music....................................................... 26, 27 Location....................................... 18, 34, 49, 55 Mute ............................................................. 24 Lock ................................................................. 9 Name............. 10, 30, 36, 39, 40, 48, 49, 54, 68 Logs ...............................................................50 Networks........................................... 27, 44, 68 Main Menu....................................................27 New Action ............................................... 7, 49 Manual ................................................ 7, 55, 64 New Character .............................................. 49 Max ......................................................... 31, 52 New Effect .................................................... 49 Memory............................................. 48, 63, 64 New Object ................................................... 49 Menu New Powerup ............................................... 49 Selection............................ 39, 41, 43, 44, 52 Next Checkpoint ........................................... 17 Message .................................................. 40, 68 Notes ....................................................... 40, 54 Middle ...........................................................40 Numbers ............. 13, 17, 22, 24, 30, 48, 51, 65 Mobile ......................................... 33, 42, 49, 63 Object Mobile Devices .................................. 33, 42, 63 Settings ..................................................... 67 Mode ..................................... 20, 24, 47, 50, 56 Type .................................................... 14, 60 Motor ...................................................... 32, 51 Object Bar ............................................... 14, 17 Motor Speed .................................................32 Objects Motors..................................................... 25, 55 All ........................................................ 17, 53 Mouse ........................................... 8, 23, 54, 63 Offset ............................................................ 56 Mouse Button ...............................................63 Opaque ..................................................... 9, 54 Move..9, 12, 14, 17, 19, 21, 23, 24, 25, 32, 33, 34, 41, 42, 43, 48, 51, 52, 53, 55, 66 Open ................................................. 22, 26, 28 Move Character ............................................25 Move Down ....................................... 32, 53, 54 Opposite Directions ...................................... 55 Optimise........................................................ 48 Option ............................................... 24, 35, 37 Move In ....................................... 33, 34, 43, 52 Copyright © 2015 - Buildbox.com 74 Buildbox™ User Guide Options..7, 9, 10, 13, 14, 17, 19, 21, 23, 26, 28, 30, 31, 33, 34, 35, 36, 39, 40, 44, 47, 48, 49, 51, 60, 65, 66, 67 Playing................................... 18, 26, 27, 35, 53 Advanced ...................................... 48, 60, 65 Points ................................................ 37, 51, 54 Available ....................................................40 Populated...................................................... 10 Overlay ............................................................ 8 Powerups ................................ 8, 17, 30, 31, 50 Overview ................................................. 26, 62 Preset ............................................................ 52 Padding .........................................................35 Pressed...................... 16, 17, 30, 31, 42, 51, 53 Paint ........................................................ 19, 21 Pressing ............................................. 30, 55, 63 Panel .............................................................65 Preview ................................................... 47, 62 Parallel .................................................... 49, 55 Project ............................................... 49, 50, 54 Parent .......................................... 12, 15, 17, 51 Properties ........... 14, 17, 18, 19, 51, 54, 56, 67 Pause ........................................... 26, 30, 32, 33 Properties You ........................................ 14, 56 Pause Screen ..................................... 26, 32, 33 Purchase ................................................. 18, 30 Peak ......................................................... 19, 21 Random................................................... 22, 49 Peak To .................................................... 19, 21 Ready ...................................................... 49, 50 Pencil ................................................. 10, 54, 63 Refill .............................................................. 31 Physical ............................................. 12, 19, 56 Remove Ads .................................................. 33 Physical Properties .................................. 19, 56 Remove All .................................................... 50 Physics ................... 7, 14, 19, 24, 52, 56, 59, 67 Replace ......................................................... 18 Physics Object ...............................................56 Require.......................................................... 52 Physics Properties ................................... 19, 67 Reset ....................................................... 31, 38 Pivot ............................................ 15, 51, 55, 65 Resize ...................................................... 19, 43 Pixel ......................................................... 54, 63 Restart .................................................... 17, 47 Pixels ..15, 16, 19, 21, 22, 24, 36, 48, 54, 63, 64 Restore .......................................................... 32 Placement .....................................................18 Result ...................................................... 21, 63 Placement Of.................................................18 Review .............................................. 23, 33, 68 Platforms.. ..... 12, 14, 27, 32, 39, 40, 42, 53, 68 Right..10, 13, 14, 22, 23, 25, 26, 28, 31, 32, 34, 35, 41, 47, 48, 52, 53, 65, 67 MAC OSX ...................................................43 Play Mode .....................................................24 Point................ 9, 15, 37, 51, 53, 54, 57, 65, 66 Right Click ..................................................... 23 Rotate Character..................................... 25, 53 Play Settings ..................................................61 Copyright © 2015 - Buildbox.com 75 Buildbox™ User Guide Rotate Left .............................................. 31, 34 Section .............................. 9, 12, 43, 52, 56, 67 Rotate Motors ...............................................25 Select ........ 9, 14, 18, 22, 23, 27, 37, 44, 51, 54 Rotate Right ............................................ 31, 34 Selected Image.............................................. 54 Rotated.......................................... 9, 15, 21, 66 Selected Object ....................................... 23, 24 Rotation ................ 9, 15, 20, 25, 31, 34, 51, 53 Selected Point ............................................... 37 Run Animation ..............................................18 Selected Scene .............................................. 24 Runner...........................................................30 Selection ............................... 39, 41, 43, 44, 52 Running ................................................... 10, 42 Selection Bar ......................... 39, 41, 43, 44, 52 Save ....................................... 39, 47, 49, 55, 64 Send ........................................................ 23, 50 Save Current..................................................49 Send Backward ............................................. 23 Saving ...................................................... 55, 64 Send To ................................................... 23, 50 Scale ............................................ 19, 20, 31, 51 Session .......................................................... 35 Scaled ...................................................... 30, 66 Set Are .......................................................... 10 Scaling ............................................... 23, 30, 63 Setting ..................................... 9, 20, 40, 43, 51 Scene..8, 9, 10, 12, 13, 14, 15, 18, 22, 23, 24, 49, 64 Settings..10, 14, 15, 17, 18, 21, 31, 39, 40, 51, 52, 53, 54, 61, 63, 67, 68 Scene Editor .................................................... 8 Setup ....................................................... 12, 40 Scenes ......................................... 22, 23, 49, 64 Shadow ................................................... 11, 36 All ..............................................................49 Shadows ........................................................ 20 Scenes View ..................................................22 Shake....................................................... 11, 18 Score ....................................................... 35, 40 Shape ................................................ 10, 37, 56 Screen..7, 8, 11, 12, 13, 17, 18, 25, 26, 27, 28, 29, 30, 31, 32, 33, 34, 35, 36, 37, 39, 41, 43, 44, 47, 48, 50, 53, 54, 55, 62, 63, 65, 66 Share ....................................................... 40, 68 Screen Shot ........................... 13, 24, 47, 65, 67 Shift ......................................................... 23, 24 Screen Shows ................................................26 Shoot ................................................. 16, 31, 42 Screen To........................................... 27, 30, 33 Shooting ...................................... 10, 41, 42, 67 Screens ................ 26, 27, 30, 39, 41, 42, 44, 68 Shooting Animation ...................................... 67 Second......................................... 12, 15, 58, 66 Shop .............................................................. 32 Second Object ...............................................12 Short ............................................................. 40 Seconds ..................... 11, 16, 18, 30, 31, 59, 66 Shot ......................................................... 37, 47 Copyright © 2015 - Buildbox.com Sheets ............................................... 36, 48, 64 76 Buildbox™ User Guide Show..9, 10, 11, 17, 18, 19, 22, 23, 26, 27, 30, 31, 40, 47, 49, 50, 55 Show Collision ......................................... 47, 50 Show List .......................................................23 Simulator ................................................. 25, 47 Single Character ............................................49 Size ................ 15, 30, 31, 36, 47, 48, 50, 51, 64 Sleep ..............................................................15 Slow ...............................................................53 Slow Down ....................................................53 Smaller ................ 15, 20, 33, 37, 38, 48, 51, 63 Snap...............................................................50 Solo ...............................................................22 Sound .......................................... 13, 18, 26, 33 Sound Off ......................................................33 Sound On.......................................................33 Sounds ............................................... 14, 21, 50 Source ............................................... 12, 63, 67 Space Shooter ......................................... 41, 42 Spawn................................................ 14, 16, 67 Start ........ 10, 15, 19, 20, 21, 22, 32, 53, 56, 65 Start Game .................................................... 32 Start Scene .................................................... 10 Stick............................................................... 55 Storage .......................................................... 64 Stored ..................................................... 63, 64 Stored In ....................................................... 64 Stores ................................................ 33, 39, 63 Straight ..................................................... 9, 52 Submitting..................................................... 39 Swing....................................................... 12, 56 System .................................................... 33, 55 Table ............................................................. 30 Tail .......................................................... 19, 21 Testing .................................................... 22, 24 Testing In ...................................................... 24 Texture .................................................... 19, 21 Ticked ...................................... 9, 27, 51, 53, 66 Tiling................................................................ 9 Special ..................................................... 22, 40 Time..8, 13, 16, 17, 18, 20, 22, 27, 30, 31, 37, 43, 49, 53, 55, 63, 64 Speed .................... 9, 15, 32, 33, 51, 52, 53, 55 Time Line....................................................... 22 Speed At ........................................................53 Trail ................................................... 19, 21, 49 Speed Increase ..............................................53 Transparency .......................................... 20, 63 Spin................................................................32 Transparent ................ 9, 30, 54, 55, 56, 58, 65 Sprite ................... 10, 36, 37, 48, 55, 63, 64, 65 Trigger ........................................................... 30 Sprite Image ..................................................37 Triggered ................................. 7, 18, 30, 31, 55 Sprite Sheet ....................................... 36, 48, 64 Turn ....................................... 12, 37, 38, 50, 55 Sprites ..................................................... 48, 65 TV ............................................................ 42, 63 Stack ..............................................................64 Types ....................................................... 14, 39 Copyright © 2015 - Buildbox.com 77 Buildbox™ User Guide Under The ......................................... 12, 23, 40 Unique ...........................................................40 Unlimited ................................................ 31, 37 Unused ..........................................................50 Updates .........................................................39 Use An ............................................... 26, 48, 66 Use This ................................................... 21, 65 Used For .............. 13, 14, 17, 20, 36, 37, 39, 53 Used To ................................. 17, 19, 30, 43, 53 Useful .............................. 10, 20, 26, 30, 40, 63 Useful For ................................................ 20, 30 User ................. 7, 26, 27, 33, 38, 40, 41, 48, 55 Uses ................................................... 10, 31, 63 Using The........................................... 12, 20, 63 Usually ............................... 9, 20, 21, 38, 40, 52 Usually Leave .......................................... 20, 21 Usually This ...................................................52 Value..11, 12, 15, 18, 20, 21, 31, 32, 33, 36, 40, 44, 48, 52, 53, 54, 55, 65, 66 Version .................................... 2, 32, 39, 49, 50 Vertical ........................................ 24, 41, 42, 52 View ........................................................ 10, 22 Visible...................................................... 38, 63 Wait .................................................. 31, 53, 55 Wake ............................................................. 15 Wasted .......................................................... 64 Wave ....................................................... 19, 21 Wave Movement .................................... 19, 21 Wheels .................................................... 14, 55 Wide...................................... 19, 21, 30, 44, 64 Window... 33, 39, 41, 43, 44, 47, 52, 63, 66, 67 World ...................................................... 53, 61 Worth ............................................................ 64 Yellow ............................. 12, 39, 41, 43, 44, 52 Zoom ................................................. 23, 38, 50 Copyright © 2015 - Buildbox.com 78


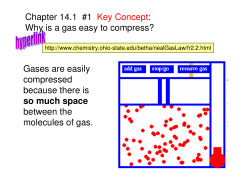
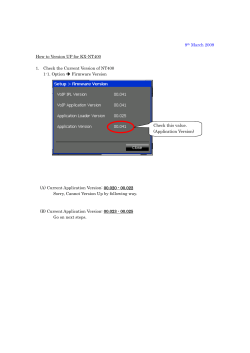
© Copyright 2025