How to Use My Big Campus www.mybigcampus.com.
How to Use My Big Campus (030512)
MBC 100: Get Started
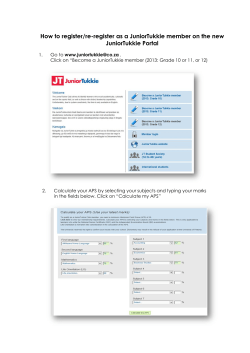
LOGIN TO MY BIG CAMPUS
- Open your web browser and navigate to www.mybigcampus.com.
1. Click Login
2. Enter your DISTRICT username and password
3. Find your school by typing the first few
letters of the school name. Select your
school once it appears in the list.
4. You may click
REMEMBER ME
5. Click LOGIN
6. The first time you login you will be asked to accept the terms of use policy.
7. Once you login, you will be taken directly to your Activity Page.
SUPPORTED WEB BROWSERS
- My Big Campus continues to improve and add features. Some of these features do not work quite
as well on older browsers. If you are seeing display issues, fields missing that are supposed to be
there, or the inability to drag and drop files, this may be due to an outdated browser. To ensure you
have access to all our great features check to see if your browser is on our compatibility list:
Internet Explorer 8+
• Firefox 4+
• Safari 4+
• Chrome
MBC 103: Ditch the Thumb Drives - Access Your Files and Resources from Anywhere
- "Your Stuff" allows you to store private files such as photos or works in progress. These files can be
accessed from anywhere, therefore eliminating the need for flash drives.
ADDING FILES
1. Click YOUR STUFF to upload and access your files.
2. Click ADD and then select FILE
3. Click CLICK HERE TO UPLOAD FILES link
or drag and drop files you want to upload
4. When the file is uploaded it will
appear below the upload box with
a check-mark next to it.
- You can control where you want to share an item by simply clicking on the icons located to the right
of the file name.
• Click on gear icon to change where your file is shared.
•
Click on the globe icon to see where your file is being used.
MBC 104: Organize Your Files and Resources
"Your Stuff" is where users can store private files such as photos or works in progress. These files
can be accessed from anywhere, eliminating the need for flash drives. You can organize your items
in "Your Stuff" in a number of useful ways.
USING COLLECTIONS
- Collections are sets of library items and/or your files, which are particularly
useful for presenting the resources you’ve used (or would like used) for a
particular assignment.
- You can include items you’ve added to the library (also found under "Your
Stuff") or search the library for resources added by others.
To create a collection:
1. Click on the blue ADD link in the "Collections" box found on the
left navigation bar.
2. Type the name you'd like to give your collection in the box.
3. Click the ADD button. Your collection name will now appear within the box.
To add an item to a collection:
1. Check the box that appears next to
item name(s).
2. Click on the ADD TO COLLECTION button at
the top of the page and select from the dropdown menu the name of the collection to which
you would like to add the item(s).
3. To view all the
items in a collectionClick on the name of
the collection.
USING LABELS
•
Labels help you organize your items into virtual "folders" so you can find them by subject, item
type, or any other category.
•
Labels are only for items you have uploaded.
To assign a label to an item:
1. Check the box that appears next to item name(s).
2. Click on the "Apply Label" button at the and select the
name of the label you want to apply.
To add a label: click on the blue "Add" link in the "Filter by
Labels" box. Type name in the box and then click the "Add"
button. Your label name will now appear within the box.
To delete a label, click the blue "Manage Labels" link and a
red box will appear next to the label names. Click the name of
the label(s) you would like to delete.
•
•
Once a Label has been applied to an item, a box will appear underneath the item listing the label
name. You can delete an item's label by simply clicking the "X" that appears to the right of the
box.
You can assign more than one label to any given item. Each individual label will then appear
underneath the item.
USING SEARCH & FILTER
To search "Your Stuff", type your search term in the search field. All
corresponding results will then appear in the listing.
Filter by KIND: Check the box(es) next to the type of item(s)
you would like to search for.
Filter by LABEL:. Check the box(es) next to the label(s) for
which you would like to search.
NOTE: You can also filter your search results by both kind and label.
MBC 102: Start Communicating with Everyone at Once Through Groups
CREATE A GROUP
3. Enter a title for your group
4. Enter a brief description.
1. Click on "Groups
2. Click on the “Add Group” link
5. Click SAVE
To ADD MEMERS:
You are this group’s owner, so
you’ll see Group Controls such
as Edit, Import, Maintenance,
Clone, and Delete.
To Add Members to Your Group:
1. Click on "Members."
2. Begin typing the first few letters of a name in the
search box. MBC will show you matching names.
3. When you’re done entering names, click "Add" and
everyone you entered will now see this group’s name
listed under "Groups." You can always access your
group members' information by again clicking
"Members."
As people learn about your group, you may also receive requests to join (or leave) your group under
"Notifications"
ADD A PAGE FOR THE GROUP:
1. Click the PAGES tab
2. Click the ADD PAGE button
3. Enter a PAGE TITLE
4. Enter your content using the editor. If you mouse over the icons, a pop-up will
appear to tell you the function of the icon.
5. Assign page permissions to your group members.
• Who can view this content
• Who can edit this content?
• Who can delete this content?
6. Click SAVE
7. Your new page will show when
group members click the PAGES tab
8. To work on the new page click the page name.
9. This gives you option buttons to:
• EDIT PAGE*
• VIEW PAGE HISTORY*
Gives you access to all previous versions of the page.
• ADD SUB-PAGE*
Will create a new page nested under the previous page
• DELETE PAGE*
(*Depending on the group member’s permissions)
ADDING EXISTING RESOURCES FROM “MY STUFF’ AND FILES:
1. Select the RESOURCE tab
2. You can create FOLDERS to organize your resources
3. By clicking the blue links you can browse your resources and add them
to the group’s resources.
4. Your added items will show in a list.
5. Be sure to click SHARE ATTACHED ITEMS
TO LOGOUT:
© Copyright 2025


