How to set up and use the Remmers Sleep Recorder
How to set up and use the Remmers Sleep Recorder
Step 1
Plug power cord into the back of the recorder, and into an electrical wall socket. There is no on/off
switch. In the morning simply unplug the recorder and be sure to pack the cord into the front pouch
of the carry case.
Step 2
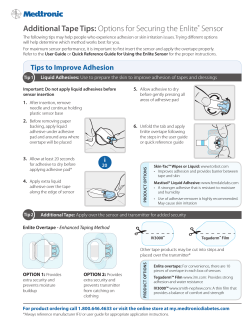
Apply snore sensor to the hollow of the neck, just above the sternum.
1. Place double
sided round
sticky tape on
smooth surface
of sensor.
2. Peel off the
paper covering
of the double–
sided tape
3. Apply an
additional
piece of tape
as shown with
the wire running down the
chest
4. Press lighted
green mode button until “snore
sound” appears.
Make a snoring
noise to confirm
movement of the
bar indicators.
5. Press mode
button one more
time to confirm
that the word
“supine appears
when you lie
down on your
back.
Step 3 Apply the nasal flow canula
6. Place the prongs in the
nostrils and loop the
tubing around the ears.
Slide the tightener gently
up to snug the tubing
enough for comfortable
stability.
7. Insert the filtered
end into blue receptacle. Select mode,
“nasal flow”. Take a
nasal breath to confirm movement of the
bar indicators.
Step 3 - Apply pulse-oximetry sensor to index finger
8. Orient the
pulse-oximeter
sensor to the
finger tape.
Match the hole
sizes to align
the sensor.
9. Peel off the
paper backing
to expose the
sticky side.
Stick the sensor to the tape
10. Invert the tape
and orient to the
finger as shown with
the sensor centered
on the nail. Remove
all nail polish and
select the index finger with no bruise or
injury.
11. Stick the three
short tabs to the
finger and wrap
the long one
around to secure
the fit. It must be
firm to preclude
movement but not
so tight the pulse
is felt.
12. Leave a little
slack in the wire and
tape it to the finger
to prevent movement of the sensor
during sleep. Also
secure the wire at
the wrist as shown.
13. Wrap the
velcro protector
around the
taped sensor
14. Use the mode button to select oximtery.
You should have a reading of 96—98% and
will see the pulse as the
bar indicators move in
time with the pulse rate.
15. Review each
mode to make
sure the recorder
is properly sensing. The screen
will note “not
recording”
16. Use mode button to
show the “memory screen”.
The indication shown
should be visible to insure
adequate disk space for the
night. If not, call your dentist.
Step 4 - lights out - Press the mode button and hold for 3 seconds until the alarm ends.
Following the alarm, the recording begins.
If you need to use the bathroom in the night, disconnect the three leads and leave the sensors attached to you. If
you return and reconnect within about 5 minutes, the study will continue uninterrupted. If it is longer and an
alarm sounds, don’t worry. Simply unplug the device, replug it and start the study again by pressing the mode
button for three seconds until that alarm ends.
Step 5 - Upon waking, unplug the device. There is no on/off switch.
Discard nasal canula
Remove tape from the throat sensor, carefully place the sensor in the plastic bag
Place the velcro wrap in the tape bag, carefully remove tape from the finger sensor so as not to pull on the wire.
place the sensor and wire in a baggie. Place the recorder in the carry bag along with all the sensors including the
instruction book and power cord. BE SURE TO INCLUDE THE POWER CORD.
Step 6 - Return the carry case to dental office at the appointed time, or as early in the day
as possible to facilitate the next night’s study. Thanks
© Copyright 2025


