
Chapter 3 - AutomationDirect.com
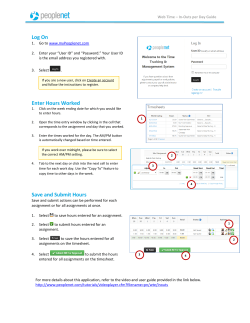
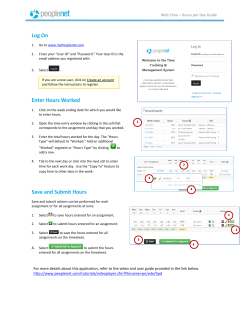
MANAGING
PROJECTS
CHAPTER
3
In This Chapter
Get Started Using DirectSOFT 6 . . . . . . . . . . . . . . . . .3-2
Create a New Project . . . . . . . . . . . . . . . . . . . . . . . . . .3-4
Importing Projects . . . . . . . . . . . . . . . . . . . . . . . . . . . . .3-5
Copy or Save Existing DirectSOFT Files . . . . . . . . . . .3-7
Chapter 3: Managing Projects
Get Started Using DirectSOFT 6
2
3
D
5
6
7
8
9
1
11
2
13
4
A
B
C
D
To open DirectSOFT 6, double-click on the DirectSOFT 6
icon which was installed on your desktop screen during
the installation of the software. You can also click on Start
located in the left-hand corner of the computer monitor. Once you do
this, select Programs, find DirectSOFT 6, then select DSLaunch 6
in the drop-down window. The DSLaunch window, shown below, will
appear. The DSLaunch window displays all of the applications and
PLCs that DirectSOFT 6 supports.
Understanding the Launch Window
DirectSOFT 6 Programming Software is much more than a PLC
programming package. With the Launch Window concept, utilities,
such as, NetEdit, CTRIO WB, etc., can all be launched from one
central location. The Launch Window is also used to create and
manage PLC projects and the communication links between your
personal computer and the PLC.
Notice the different areas in the Launch Window. There is a menu
tree very similar to what is in Windows Explorer. All that you see in
the menu tree can be accessed from the tree.
Utilities, such
as NetEdit
Installed
Support
Communication
Links to PLCs
Windows-type
Menu Tree
3-2
DirectSOFT 6 User Manual, 1st Edition
Chapter 3: Managing Projects
The menu tree has four folder/icons which are:
• Applications - These are the applications currently installed in
DirectSOFT 6. The only installed application available is DirectSOFT
6 Programming. This is the point where you start a new project.
• Utilities - Several utilities are installed here such as, ERM
Workbench, CTRIO Workbench and NetEdit. They are installed
automatically when DirectSOFT 6 is installed.
• Projects - This folder/icon will contain the projects which are created
in DirectSOFT 6. A project is the collective name for your ladder logic
program and all of the documentation associated with it. Newly
created projects and existing projects will reside here. As projects are
created, they are added to the end of the list.
• Comm Links - This folder/icon will contain the communication links
between the personal computer and the different PLCs that you have
(See Chapter 9).
DirectSOFT 6 User Manual, 1st Edition
2
3
D
5
6
7
8
9
0
1
2
3
4
A
B
C
D
3-3
Chapter 3: Managing Projects
Create a New Project
New Program
2
3
D
5
6
7
8
9
1
11
2
13
4
A
B
C
D
To create a new program, double-click on DirectSOFT 6
Programming in the Applications folder on the DSLaunch menu
tree.
Double-click here
to start a new
program
Enter the New Project Information
The New Project dialog box is used to define several things.
• New Project Name Ҁ enter a name for your project (up to 32 characters
- no extension).
• Family Ҁ select the DirectLOGIC PLC family (or compatible) you will be
using.
• Type Ҁ select the CPU you are using from the available list. Remember,
different PLCs use similar instructions, but they are still different in some
ways. For this reason, it is extremely important that you specify the
correct CPU.
• Browse Ҁ you can keep the default project path,
c:\DirectSOFT6\projects, or use the Browse button to either select a
project not shown on the menu tree or a different folder with the project
listed in it.
3-4
DirectSOFT 6 User Manual, 1st Edition
Importing Projects
Chapter 3: Managing Projects
You may already have TISOFT or Logicmaster programs stored
on your PC’s hard drive or on a disk. You may also have projects
that were exported from DirectSOFT version 5. Use the following
procedure to import these programs.
1. Open the New Project dialog as described on the previous page.
2. When the New Project dialog appears, click on the Cancel button.
The programming window will remain on the screen.
3. Click on File on the toolbar, then select Import > Program. The
Import Program dialog will appear as shown below.
4 Locate the program to be imported by selecting Look in:, then the
location of the program.
5. Select the Files of type: to choose the correct file, such as, TIsoft
(*.vpu).
6. Select the program to be imported (up to 32 characters with no
extension) from the location where the program is found. The file
name should appear in File name: area.
7. Either enter a name for the project in the New Project: area or use
the Browse button to select the name from a location of your choice to
store the project.
2
3
D
5
6
7
8
9
0
1
2
3
4
A
B
C
D
8. Click on the Open button to start the import process. An indicator
window will appear to let you know that the program is being imported.
After the program has been imported, it will appear as a normal
DirectSOFT 6 program.
DirectSOFT 6 User Manual, 1st Edition
3-5
Chapter 3: Managing Projects
Program Documentation Mapping from TISOFT and
Logicmaster
2
3
D
5
6
7
8
9
1
11
2
13
4
A
B
C
D
3-6
Although most of the documentation will have a counterpart in
DirectSOFT 6 some of the documentation will not. The following table
shows what is imported, what is not and the DirectSOFT 6 counterparts.
TISOFT Source Documentaion
DirectSOFT 6 Documentation
Logicmaster Source Documentaion
DirectSOFT 6 Documentation
Title Page
Synonyms
Comments (tied to output coil)
Descriptions
Nicknames
Names
Comments
Coil Labels
DirectSOFT 6 User Manual, 1st Edition
Title Page Editor
Element Description
Rung Comments (tied to rung)
No Match
Nicknames
Description
Comments
No Match
Chapter 3: Managing Projects
Copy or Save Existing DirectSOFT Files
The question often arises as to what is needed when copying
existing DirectSOFT files to a different memory area or directory.
If you are a first time user of DirectSOFT 6 and have no existing
files to transfer, then you may skip this page and read it later.
By default, projects are stored originally in the Projects
subdirectory, however, they can reside in areas other than the
default projects subdirectory. It really does not matter where they
are storedҀthe method for copying or saving these existing files
to another area is the same in each case.
If you look where the projects have been stored, you will notice
the main file for the project will always have a .prj extension after
its root filename, but there are other files with the same root
filename. This can be a little confusing to new users. This is due
to the fact that DirectSOFT 6 performs a filename creation
behind the scenes, and you don't get involved with the initial
storage except to indicate the root filename and directory path.
A frequently asked question is "which of these files do I need
when making the storage transfer?". Copying or saving the
filename.prj will be insufficient to truly transfer the total project.
Not all of the files are necessary to recreate the program, but if
you eliminate any of them, you may lose some important
documentation and indexing information. The table shown on the
following page lists the different file extensions and what they
contain. The safest choice is to save or copy all files for a project
having the same root filename, regardless of the different file
extensions (see the table on the next page).
DirectSOFT 6 User Manual, 1st Edition
2
3
D
5
6
7
8
9
0
1
2
3
4
A
B
C
D
3-7
Chapter 3: Managing Projects
DirectSOFT 6 Project Files
File Extension
2
3
D
5
6
7
8
9
1
11
2
13
4
A
B
C
D
3-8
dataviewname.dta
filename.dv
filename.esd
filename.esx
filename.inf
filename.lcd
filename.lcx
filename.lda
filename.ldo
filename.pid
filename.prj
filename.prt
filename.rd
filename.rf
filename.scd
filename.scx
filename.tls
filename.vd
filename.vf
filename.wsp
filename.xml
Contents
Data views are not associated with one single
project, but can be shared among multiple projects
DV1000 setup
Element documentation
(nickname, wiring information, description)
Index file for the element documentation
Project information
Ladder rung comments
Index file for the ladder rung comments
Connects rung comments to correct rung no.
Online only: connects to correct rung number
(temporary until saved offline to *.lda)
PID documentation
Contains the ladder program
Print settings
305 R-memory data
305 R-memory editor format
Stage comments
Index file for stage comments
PLC parameters, I/O configuration, pause bits
V-memory data
V-memory editor format
Position of program windows, colors, etc.
Docking pane layouts
Files Associated with DirectSOFT 6 Project Files
File Extension
importexport doc.namename.csv
ctrioworkbenchname.cwb
ermworkbenchname.erm
importexportmnemonicname.txt
Contents
Comma Separated Variable
Counter I/O configuration
Ethernet remote master configuration
Text file
DirectSOFT 6 User Manual, 1st Edition


© Copyright 2025