Ombre Hand Dyes FREE PROJECT Rainbow Square Quilt Fabric by Marcus Fabrics
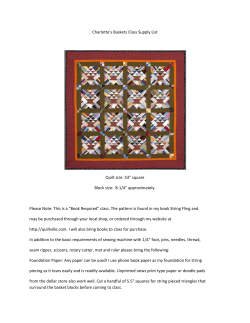
FREE PROJECT Ombre Hand Dyes Fabric by Marcus Fabrics Quilt by Nancy Rink of Nancy Rink Designs Rainbow Square Quilt 40” x 60” 980 Avenue of the Americas, New York, NY 10018 y www.MarcusFabrics.com HELPFUL TIPS for working with Ombre Hand Dyes Strip-It™ Bundles by Nancy Rink of Nancy Rink Designs Because the Ombre Hand Dyes Strip‐It Bundles are also hand cut, it is likely that you will find variations in either the color, the width of the strips, or both. But don’t let that deter you from using them, because the three quilts in this pattern were made with this in mind. Here are some tips for working with the strips: A. If the strips are of uneven widths, simply go ahead and sew them together anyway. To adjust the strips for the various projects: ◄ For Rainbow Square, the blocks are sewn a bit oversized and are trimmed to 10 ½” prior to sewing them together. ◄ For Prism, the triangles have two bias edges, so you should be able to ease seams together. Spray starch and a little steam are your best allies when it comes to easing sides together. If you are uncomfortable doing this, then select one triangle that is on the smaller side and trim the larger triangles to match. ◄ For Weave, the strip pairs should measure 4 ½” wide, from raw edge to raw edge. Trim them if they are too wide. Since no seams match up, you don’t have to worry. If the strip pairs are a bit narrow, sew a slightly narrower seam. B. If some of your strips are “V’ed” at the fold, here is how to adjust— For Rainbow Square, no adjustment is necessary; the strips will be cut apart at the fold. For Prism and Weave, there are a couple of ways to straighten the strips: 1. Make a registration line on your ironing board with a wash‐away pen or with painter’s tape. Spritz the strip with water until damp. Align one long strip edge with the registration line. Pin in place if desired. Using a hot iron, press the strip and let dry. If fullness remains, repeat this process, targeting the area where the fullness is. Or, stitch a little pleat to take in the fullness. Once you sew everything together the pleat is barely noticeable. 2. Cut the strip in half on the fold. Align both halves, and square up the cut ends. Stitch the halves back together, pressing the seam open. If you like, you can also sew together the selvedge ends, just make sure to trim off the selvedge. This results in a reverse ombre’ and is a nice way to create a little more variation in your quilt. Download these free projects at www.MarcusFabrics.com/MakeIt MARCUS FABRICS 980 Ave of the Americas, New York, NY 10018 y www.MarcusFabrics.com www.NancyRinkDesigns.com Ombre Hand Dyes Fabric by Marcus Fabrics Fabric Requirements One Ombre Hand Dyes Strip Roll # ST01 ½ yard Centennial Solid Rare Wine # 5901-1174 for binding 2 2/3 yards backing fabric Quilt by Nancy Rink PAGE 2 of 3 Finished Quilt Size: 40” x 60” y Finished Block Size: 10” x 10” General Information: PLEASE READ BEFORE UNROLLING THE JELLYROLL. In your jellyroll are two strips each of twenty different fabrics. Each strip should measure 2½” wide by approximately 44” long. Each strip has an ombre effect where the color graduates from a deeper shade at the selvedge to light in the middle back to the deeper shade at the opposite selvedge. In the quilt shown, like analagous colors (those next to each other on the color wheel) are grouped together to create the blocks: reds are grouped with reds and pinks, oranges are grouped with golds and yellows, greens are grouped with olives and greenishbrowns, and purples are grouped with reddish-browns. The jellyroll should already reflect this sense of organization. If you unroll it carefully and keep the strips in order, the guess-work of how to organize the strips is already done for you. Sewing 1. To begin, unroll the jellyroll and remove the first two strips. These strips should be identical. Cut them in half along the fold. This yields four strips approximately 22” long on which the color graduates from light to dark. Lay the strip out as shown in Diagram I, stacking one on top of the other. Diagram I Remove the next two strips and cut in half along the fold. Lay out this set of matching strips so that the light and dark ends are in the reverse position of those of the first strip. Sew these two strips together. Press all seams in the same direction. (Diagram I) Diagram II 2. Now, remove the next two strips from the jellyroll, cut them in half, and lay them out, once again reversing the position of the light and dark ends of the strip. Sew strip to the first two. Press all seams in the same direction. Continue adding strips in this manner until you have four strip-sets with five strips. (Diagram II) 3. Cross-cut THREE of the matching strip-sets into six 9 ¾”-wide segments. (Diagram III) 9 ¾” Diagram III 4. Cross-cut the remaining strip-set into six 2”-wide segments. Note: if you cut three strips from one end and three from the other, your blocks will have more dramatic color shifts. (Diagram IV) 5. The next step involves sewing the 2” wide strip into the 9 ¾” segment. However, before you cut a 9 ¾”-wide strip-set, audition various 2”-wide strips by laying one at a time on top of a 9 ¾” segment. Make sure to reverse the direction of the 2” wide strip. You will notice that the look of the blocks changes depending on where you place the strip. 2” Diagram IV MARCUS FABRICS y 980 Avenue of the Americas, New York, NY 10018 y www.MarcusFabrics.com Ombre Hand Dyes Fabric by Marcus Fabrics Quilt by Nancy Rink PAGE 3 of 3 Notice what happens with the middle strip. There is not much difference in color here. Shifting the strip toward the right side of the block may be a solution. Or, audition another strip. This one, which is cut from the other end of the strip set, provides a stronger contrast. 6. Measure 3” from one end of the 9 ¾” segment. Cut vertically. Sew 2” strip in between the two parts, matching seams. Press. Trim block to 10 ½” square. (Diagram V) 7. Repeat steps 1-6 using the remaining jellyroll strips. Make a total of 24 blocks. Quilt Assembly 1. Layout quilt blocks in 6 rows of 4 blocks each. Refer to picture of quilt or to any of the layout options shown below. Sew blocks together in rows; then, sew together the rows. Diagram V Finishing 1. Layer top, batting, and backing (two 41 x 47” panels). Quilt in an all-over design. 2. Bind with Centennial Solid Rare Wine fabric, cut into 2 ¼”-wide strips. Quilt Layout Options Visit www.nancyrinkdesigns.com for more patterns and quilt ideas and kits MARCUS FABRICS y 980 Avenue of the Americas, New York, NY 10018 y www.MarcusFabrics.com
© Copyright 2025


