We look forward to using your photography and creative talent... project. Campus Letter Art uses ...
We look forward to using your photography and creative talent in this
project. Campus Letter Art uses photography taken on a university
campus as the basis for each letter of the alphabet. These photos spell the
name of the college or university on the print. Every photo has a legend
identifying the location or landmark where the photo was taken. MVP
PICS is licensed with the Colleges and Universities to sell this
product and pays a royalty to the institution. The following pages
give examples of completed prints as well as a FAQ to serve as a guide for
your work. If you have any questions please email or call.
Jon Hart
Jon@GetLetterArt.com
719-494-8156 (O)
Thank you for your interest in this photo art project. The objective is to take high resolution, digital
color photos of parts of buildings, structures or statues that end up spelling the name of the university
and/or the school nickname.
Below is an FAQ along with finished examples.
Q: How do I “see” the letters
A: This project is like a photographic scavenger hunt. You are going on campus looking for letters
hidden in buildings, sculptures and nature. Certain letters are easier to find than others. E's, C's, D's
and A's can be found in most buildings; those with columns tilted 90 degrees are E's, the archways
make D's and C's (again tilted 90 degrees) and look at many windows and you'll see the A. Letters like
R's and G's can be less obvious. Look at a curved walkway or elegant gate and you may just see that
S. In most cases show as much of a building as possible to make the letter, like a tall tower for an I or
the roof line for an A. Pictures are worth a thousand words so examples of many letters are attached in
this document.
Q: What type of images should I shoot?
A: Each campus has buildings or areas that are well known to the students, faculty and alumni. Your
focus initially should be on capturing those images. The final product will have a caption under the
image disclosing where on campus the image was taken so having a nice diversity from the school
makes a better product. However, images that look like the letters are more important than forcing an
iconic building into the mixture that doesn’t look like the letter. The best images are those where
the majority of an iconic building is used and it looks like a letter. (see examples).
Q: Do I need a special camera?
A: No. Most mid level digital cameras will work use settings for HIGH resolution. Cell phone cameras
will not work. Just make sure the image is in focus and do NOT zoom in too close to the letter as our
designer will crop the final image. Examples of photos before and after are included in this document.
Q: Do colors matter?
A: Yes, the photo letters are in color and the diversity makes the final image more appealing, but don't
skip a letter just because you think you have too many images that look red. In all cases take the shot
and document it we will use what we can. You can't take too many pictures.
Q: Should I take multiple shots of each letter?
A: Yes, take at least two photos of each letter so we can choose the photo that works best in the
composite image. For example, if your school has 1 E in it, make sure to provide 2 E's. If it has 3 A's
in it, shoot 6 A's.
Q: If I am asked to shoot 2 words (such as Clemson and Tigers) can I just take two E's since there is
one E in each word?
A: Yes, since each piece will stand on its own, we will produce a Clemson print and a Tiger print so
you don't have to take 4 E's, just 2.
Q: What if I have the perfect B in Alabama and I can't find a backup B?
A: We ask for backup letters to aid us in the design of the product but if you cannot find another B
then the one B will suffice.
Q: What about angles, shadows and lighting?
A: Try to find the best angle that captures the letter. In most cases a vertical shot (turning your
camera 90 degrees) is better than a horizontal shot because the final images have a vertical
orientation. If the shot is of a free standing element (like a sculpture) try to shoot the photo with as
little background interference as possible (like people walking past the sculpture). Shadows and
lighting are not critical but try to avoid glare and hot spots from the sun. If you use a gate (great for
G’s and S’s) try to frame a building in the background. Because the final images are vertical in the
print do not zoom in too close to the letter you are shooting and/or turn your camera vertically. Our
graphic artist will make adjustments to enhance the letter if necessary.
Q: Are any buildings or structures “off limits”?
A: Every photo must be from the campus and from the outside NO INSIDE PHOTOS. Also, do
not take photos of fraternities, sororities or any off campus hangouts like bars. Do not take multiple
photos of one building unless it's a very important building that offers a couple letters needed. Do
not concentrate on a certain part of the campus like the athletic stadiums or medical buildings so as
to maintain diversity.
Q: If I can find a letter in a sports stadium should I use it?
A: Yes. Athletics are part of a campus especially big time football or basketball venues. If you've
been asked to shoot the team name in addition to the school name then by all means take a shot of
something that forms a letter in the stadium.
Q: How do I label the photos?
A: Name the file with the School, the letter and the image name or location, for example:
Clemson_M_Ascend Sculpture
Texas Lutheran X_Chapel of the Americas
If you have sculptures in your photos it is only necessary to get the name of the sculpture, not the
artist.
Q: Where do I upload the photos?
A: We have set up a large capacity transfer website. See the attached document that details how to
upload your photos.
Q: What type of format and file size shall I use?
A: The key factor is that the photos are taken in high resolution and not edited on your end. Jpeg
format is preferred.
Q: How long will it take and how will I receive payment?
A: Estimate 2-3 hours on campus. Once you start “seeing” the letters the pace will accelerate. We
will pay your fee upon delivery of the photos. Payment will be by check. We will need your Social
Security number or Business ID number for tax reporting purposes which is included on the
Copyright Release form attached to this document.
Original Photo for “W” above, original photo for “I” below
Original Photo
Final Application
Final Examples
ASSIGNMENT OF COPYRIGHT
FOR GOOD AND VALUABLE CONSIDERATION, receipt of which is hereby
acknowledged ________________________________________("Assignor"), located
at ______________________________________________________, hereby irrevocably
transfers and assigns to PRINTS CHARMING, LLC ("Assignee), located at
1941 Highway 86, Milford, IA 51351, its successors and assigns, in
perpetuity, all right (whether now known or hereinafter invented),
title, and interest, throughout the world, including any copyrights
and renewals or extensions thereto, in “University Art” photographs
photos of letters coming from buildings, structures, trees, etc. on
campus
IN WITNESS THEREOF, Assignor has duly executed this Agreement.
______________________________________
Print Assignor Name
By:___________________________________
Authorized signature
Date: ____________________
Address:____________________________________________________________
Photos taken for: _________________________________________
Fax to: 712-337-0184
Email scanned document or take a picture of the document to:
shirley@getletterart.com
Snail mail to: MVP PICS
1941 Highway 86
Milford, IA 51351
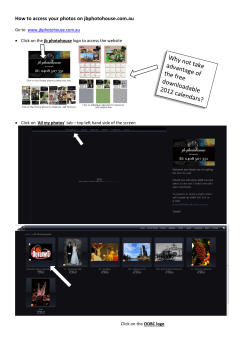
Photo processing procedure
1. Download your images from your camera to a folder on your hard
drive or disk.
2. Open your computer image viewer and label each photo as shown in
these examples (School, Letter, Name/Location):
Clemson_M_Ascend Sculpture
Texas Lutheran_X_Chapel of the Americas
3. Compress all of your images into a zipped file. If you do not know
how, please refer to http://support.microsoft.com/kb/306531 if you have
a PC. For Mac refer to http://www.dummies.com/how-to/content/howto-zip-and-unzip-files-on-your-mac.html
4. Internet Explorer, Firefox or Apple Safari browsers seem so work
best. Go to this URL to upload your images (no “www” in front):
http://mvpfiles.com/
5. Type username: mvp_upload
6. Type password: mvp_guest
5. Click on the “Choose Files” button.
6. Navigate to the folder you created for the images.
7. Select the compressed (zipped) file that you created.
8. Click “Upload”. It will take different amounts of time to upload
depending on your Internet speed and the total size of the files. When
the upload is complete it will say so on the web page.
9. When the upload is complete send an email to the person you have
been corresponding with so they know you have completed the upload.
© Copyright 2025

