How to configure your mobile devices post
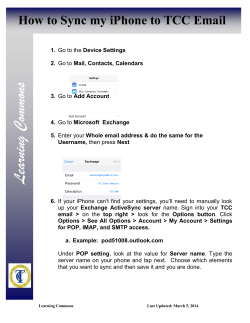
How to configure your mobile devices post migrating to Microsoft Office 365 1 Contents Purpose ................................................................................................................................ 3 Document support boundaries .............................................................................................. 3 Examples used in this document ........................................................................................... 3 iPad and iPhone (iOS 4.x and 5.x) ........................................................................................ 4 iPad and iPhone (iOS 6.x) ..................................................................................................... 9 Android Version 4.0.3.......................................................................................................... 13 Android Version 4.1.1.......................................................................................................... 16 Windows 8 for Phone .......................................................................................................... 23 2 Purpose This document is designed to assist with configuring your mobile device email clients, following your migration to the Microsoft Office 365 (Office 365). Document support boundaries This Document is written to support the following mobile devices using the specified Software versions listed below: Apple—iOS 4.x and 5.x Apple—iOS 6.x Android version 4.0.3 Android version 4.1.1 Windows 8 for Windows Phone NOTE For any other devices or versions of Operating Systems, please consult your manual, built in help system, place of purchase or use online searches for configuration instructions. Examples used in this document We have used examples throughout this document for usernames and email addresses Where email address is asked for, please enter your ANU email address Where username is asked for please enter it in the format listed below Uni-id@uds.anu.edu.au (for example u1234567@uds.anu.edu.au). 3 iPad and iPhone (iOS 4.x and 5.x) 1. Select the Settings app. 2. Select Mail, Contacts, Calendars. 4 3. Select Add Account. 4. Select Microsoft Exchange. 5 5. Enter the following details: Email: eg john.smith@anu.edu.au for staff or u1234567@anu.edu.au for students Domain: Leave this blank Username: eg u1234567@uds.anu.edu.au Password: your ANU password Description: ANU Email (or your own description) 6. Select Next. 7. The iOS device will locate your server settings. Select Next when it's done. 6 8. Enter server name: m.outlook.com 7 9. Select which services you want to setup: (your choice) Mail On Contacts Calendars Reminders 10. Select Save. 11. Exit Settings. 8 (iOS 5+) iPad and iPhone (iOS 6.x) 1. From the iPhone home screen, select Settings. 2. From the Settings screen select Mail, Contacts and Calendar. 3. Select Add Account. 4. Select Microsoft Exchange. 9 5. Enter the following details: Email: eg john.smith@anu.edu.au for staff or u1234567@anu.edu.au for students Password: your ANU password Description: ANU Email (or your own description) 6. Select Next. 10 7. Enter the appropriate information into the following fields: Domain/Username, Password and Server. Server: m.outlook.com Domain: Leave this blank 8. Select Next. 11 9. Now choose which content you would like to synchronise: Mail, Contacts, and Calendars. 10. Select Save when finished. 11. Exit Settings. 12 Android Version 4.0.3 (screenshots taken from a HTC device) Note for Android 4.0.3 users and earlier versions: If you have previously setup your ANU email prior to the Office 365 migration, you will need to remove the Email exchange account and add a new email account by following the steps above for the email to work with the new settings. 1. Go to Settings. 2. Select Accounts & sync. 3. Select +Add. 4. Select Exchange ActiveSync. 5. Select Manual setup. 13 6. Configure Exchange ActiveSync as shown below using your ANU ID and HORUS password. Email: eg john.smith@anu.edu.au for staff or u1234567@anu.edu.au for students Server Address: m.outlook.com Domain: Leave this field blank Username: eg u1234567@uds.anu.edu.au Password: your ANU password Select This server requires an encrypted SSL connection. 7. Select Next. 14 8. Select which accounts you wish to synchronise and update schedule. 9. Select Next. 10. Enter a description name for your new account: ANU Email (or your own description). 11. Select Finish setup. 15 Android Version 4.1.1 (screenshots taken from a Samsung S3 device) 1. Go to Settings. 2. Scroll down to Accounts. 3. Select Add Account. 16 4. Select Microsoft Exchange ActiveSync. 5. Configure the exchange account by entering: Email: eg john.smith@anu.edu.au for staff or u1234567@anu.edu.au for students Password: your ANU password 6. De-select Show Password. 17 7. If you want this to be your primary email, select Send email from this account by default. 8. Select Manual Setup. 9. Enter the following information: Domain\user name: eg u1234567@uds.anu.edu.au Password: (enter ANU password) Exchange Server: m.outlook.com 10. Check Use secure connection (SSL). 18 11. Uncheck Use client certificate. 12. Select Next. 19 13. Activation Uncheck Always show. Select OK. 14. Remote security administration: Select OK. 20 15. 16. Account Options Peak schedule: Manual Off-Peak schedule: Manual Period to sync Email: Automatic Emails retrieval size: Automatic Period to sync Calendar: 2 weeks Send email from this account by default: Check Notify me when email arrives: Check Sync Email: Check Sync Contacts: Check Sync Calendar: Check Sync Task: Check Sync SMS: un-Check Automatically download attachments when connected to Wi-Fi: Check Select Next. 21 17. Select Activate. 18. Enter a description name for your new account (i.e. ANU Email or Outlook 365). 19. Select OK. 22 Windows 8 for Phone 1. Open Settings. 2. Select email+accounts. 23 3. Select add an account. 4. Select Outlook. 24 5. Enter the required details to sign in: Email Address: eg john.smith@anu.edu.au for staff or u1234567@anu.edu.au for students. Uncheck show password. Password: (enter ANU password) john.smith@anu.edu.au *********** 6. 25 Select Sign In and the Settings screen will expand 7. Enter the additional required details, including: User name: eg u1234567@uds.anu.edu.au Domain: (Leave it blank) john.smith@anu.edu.au *********** u1234567@uds.anu.edu.au 8. 26 Select Sign In and the Settings screen will expand. 9. Enter the additional required details Server: m.outlook.com john.smith@anu.edu.au *********** u1234567@uds.anu.edu.a u m.outlook.com 10. Select Sign in. 11. Outlook will start to synchronize your email. 12. Select the Windows key to return to the main screen. 27
© Copyright 2025


